Once you’ve been able to migrate all your mailboxes and public folders from the on-premises Exchange environment to Office 365, you’ll probably be asking “What Next?” Good question. Generally, we find that organizations have undertaken this work with the goal to eventually decommission the resource forest, but you may also be working through a corporate takeover or divestment and doing essentially the same work as we’ve discussed in the previous blogs. In the end we’re left with the same task: decommissioning Exchange from the “resource” forest.
The steps involved are fairly simple, but the process used depends on what you want your end state to look like as there are a couple of options:
- Remove AAD Connect and convert all accounts to cloud based
- Retain AAD Connect and manage all accounts from the user forest
Because most organizations are looking to retain their on-premises user forest and sync accounts to Office 365 via AAD Connect, the remainder of this blog will discuss details for the second scenario. If you do need some assistance with converting to cloud-only accounts, let me know and I can look at that in other blog.
In order to manage the accounts from the user forest, all the appropriate Exchange attributes must be copied from the user forest to the account forest for each mail recipient. To do this we first need to install Exchange in the user forest so that the schema is extended. As there are a plethora of resources around on how to do that, I won’t go through process here.
Once we have Exchange installed and the schema updated, we can export the recipient attribute values from AD in the resource forest and import them to the recipient attributes in the user forest. The values for the following attributes are the ones that we need to copy across:
- proxyAddresses
- targetaddress
- msExchRemoteRecipientType
- msExchRecipientDisplayType
- msExchRecipientTypeDetails
I use a couple of different PowerShell cmdlets to export these values to CSV files that can be moved to the target forest. I then use more PowerShell to import the attribute values in the target forest. Below are some of the cmdlets I’ve used to do this in the past. They are pretty simple and not particularly elegant, but they do exactly what I need them to do, and it means I can put off becoming a scripting expert for a little while longer!
To export the SMTP (proxy) addresses for all mail recipients:
Get-Recipient -ResultSize Unlimited |Select-Object SamAccountName, PrimarySmtpAddress, @{Name=”EmailAddresses”;Expression={$_.EmailAddresses |Where-Object {$_.PrefixString -eq “smtp”}}} | export-csv c:tempmailrecipients.csv
Because not all the properties I need are exposed using the Exchange PowerShell cmdlets, I also need to use the Active Directory cmdlets to get the remaining attribute values. First I import the mail recipients exported from the above cmdlet:
$Users = import-csv c:tempmailrecipients.csv
Now I can use that to export the required attributes from the user account:
$users | foreach{Get-Aduser $_.samacccountname -properties *} | Select samaccountname,targetaddress,mailNickName,msExchRemoteRecipientType,msExchRecipientDisplayType,msExchRecipientTypeDetails,@{Name=”ProxyAddresses”;Expression={$_.proxyAddresses | where {$_ -Like “*smtp*”}}} | export-csv c:tempmailboxattributes.csv
Next we move the CSV files to the account forest and using PowerShell again we import the CSV file:
$users= import-csv c:tempmailboxattributes.csv
Because some organizations may have already configured some values for the proxyaddress attribute, I use the “add” option when importing them so as not to overwrite any existing values:
$users | foreach {Set-ADUser -Identity $_.samaccountname -add @{proxyaddresses=($_.Proxyaddresses -split “ “)}}
The remaining attribute values need to overwrite the existing values, so I use the “Replace” option:
$users | foreach {set-ADUser -Identity $_.samaccountname -Replace @{mail=$_.mail;mailNickName=$_.mailNickName;targetaddress=$_.targetaddress; msExchRemoteRecipientType=$_. msExchRemoteRecipientType;msExchRecipientDisplayType=$_. msExchRecipientDisplayType;msExchRecipientTypeDetails=$_. msExchRecipientTypeDetails}}
You should now see the users in your on-premises Exchange Admin Center as Office 365 mailboxes (see the below snip), and you can make any changes to mail-related attributes via the EAC

Figure 5: Mailboxes in EAC Image: Author
Once the user attributes have been migrated, you also need to mail enable the required security groups that have been migrated using the Enable-DistributionGroup cmdlet. This can also be scripted if you have a number of these to do.
The last step is to reconfigure AAD Connect to remove the resource forest. Initially I start by configuring AAD Connect to sync an empty OU on the resource forest side. This allows me to easily back out and re-sync the users if any issues occur. You can do this by first creating an empty OU in AD, then running the AAD Connect wizard. At the “Domain and OU filtering” screen, check the empty OU and uncheck the OU’s that contain users.
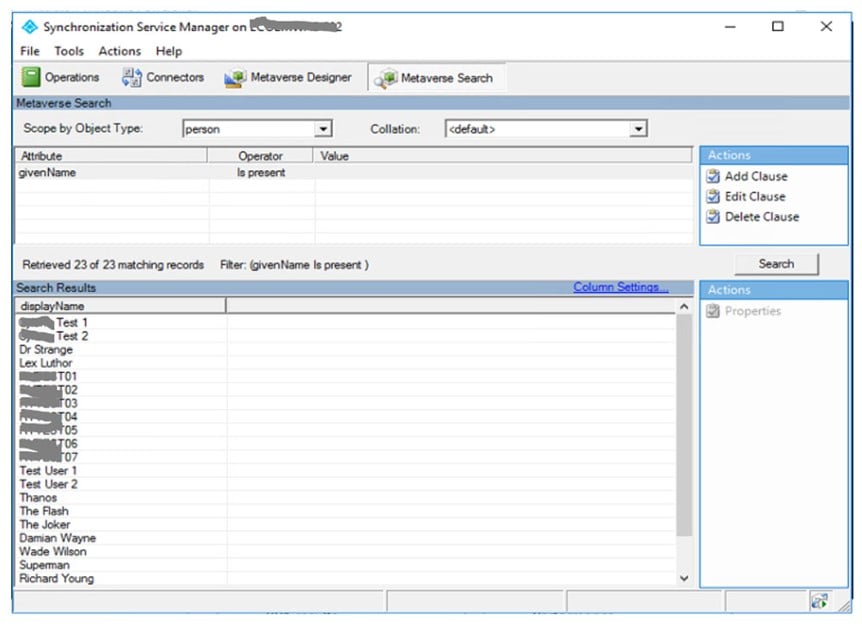
After making sure everything is working OK, you can now remove the resource forest from AAD Connect. Before I do this, I like to review the attributes that AAD Connect is synching to AAD and see what the source forest is for the values. To do this, start the AAD Synchronisation Service on the AAD Connect server and click the Metaverse search tab. From here, set the search scope to “person” and add a search clause. In the below snip I’ve configured a search clause where the givenName attribute is present, but you can choose something more appropriate for your organization. Once the clause is added, click the search button.


Figure 6: Searching in Synchronisation Service Manager Image: Author
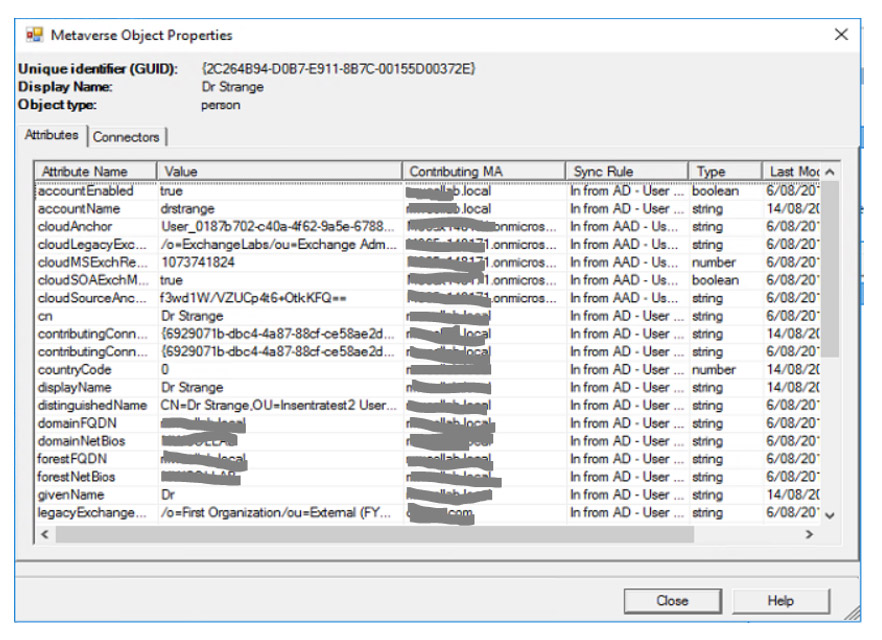
Once you have the search results, simply double click a user and review the attributes and the source forest for their values, which is found in the “Contributing MA” column. Generally, this will now be the user forest with the exception of a few legacy attributes.


Figure 7: Attribute source Image: Author
Once we are happy with the results, we can remove the resource forest. First, on the AAD Connect server we need to disable the AD Sync scheduler by running the following PowerShell cmdlet:
Set-ADSyncScheduler -SyncCycleEnabled $false
Next, select the Connectors tab in the AAD Synchronisation Service, right-click the connector for the resource forest and click Delete. You will then be asked if you want to delete the Connector Space or delete the Connector and the Connector Space. The former removes all data but keeps the configuration in case you want to use it again later, while the latter deletes the data and the configuration. Because the resource forest is to be decommissioned, You can select the second option, especially as we’ve tested the impacts previously by synching an empty OU. Once that’s completed, simply re-enable the sync scheduler:
Set-ADSyncScheduler -SyncCycleEnabled $true
And that’s it! The conclusion of a fairly long and involved process to get to the state where the resource forest can now be decommissioned! Good luck and feel free to reach out with any comments or questions.


