What is Ansible Builder
Ansible Builder is a command line tool which facilitates the development of Ansible Execution Environments (EEs).
Let’s take a step back and talk about what Execution Environments are to fully appreciate the concepts.
Execution Environments: A Quick Guide
Before the dawn of the Execution Environments, the Ansible Automation Platform execution system was executing jobs inside bubble wrap to separate processes. There were plenty of issues with this approach, including the requirement for all container-running jobs to execute in privileged mode on Red Hat OpenShift and Kubernetes.
There were other problems, too. Users had a difficult time managing Ansible module dependencies and customized Python virtual environments while using Ansible Content Collections. The concept of Execution Environments, essentially container images which can be used as Ansible control nodes, is the answer to these issues.
The Dawn of Ansible
Ansible Builder was created to automate the creation of Execution Environments so developers, contributors and consumers may benefit from this novel idea (it’s even better when the experts are able to implement the automation solution!). It accomplishes this by utilising both the user-specified dependency information and those defined in other Ansible Content Collections. The container image build will use Ansible Builder to create a directory which serves as the build context and contains the Container file and any additional files required to be added to the image.
Installation
The easiest way to install the ansible-builder is to run the following command:
(Note: If you have Ansible Automation Platform Hub nodes, the builder should be already installed there.)
pip3 install ansible-builder How to Create Ansible Builder Definition
The “definition” in the realm of Ansible Builder is a YAML file which lists the dependencies at the Collection-level, the base image source and additional components which have to be overridden in the Execution Environment. The definition file is used as the input argument by the ansible-builder build command. It outputs the build context required to create an Execution Environment image, which is then utilised to actually build the final image. The same build context created during the build can be shared with other users to create environments with specific Ansible Collections.
The following example presents a definition file:
---
version: 1
dependencies:
  galaxy: requirements.yml
  python: requirements.txt
  system: bindep.txt

additional_build_steps:
  prepend: |
    RUN pip3 install --upgrade pip setuptools
  append:
    - RUN ls -la /etc
The ansible-builder build command will default to execution-environment.yml file. To override this behavior, specify a different definition file, using -f (or —file) flag.
The elements which would be listed in the dependencies section might either be an absolute path or a relative path from the directory of the Execution Environment definition’s folder.
- The following example requirements.yml file is a legitimate requirements file for the ansible-galaxy collection instal -r… command, and it contains the following information:
---
collections:
  - ansible.posix
  - containers.podman
- You can verify the file’s configuration using the following command on a test server/workstation:
ansible-galaxy collection install -r requirements.yml- A Python requirements file for pip instal -r is referenced by the python entry under dependencies. The requirements.txt file might, for instance, have the following information:
# requirements.txt
psutil
ansible >= 2.13
firewall >= 0.2
In essence, all the collections’ python dependencies should be added to the requirements.txt file. The python dependencies can be found on the Ansible page describing given module/collection.
Similarly, to collections, it is possible to test the file using pip3 install -r requirements.txt
If there are any cross-platform requirements, they will be specified in the bindep requirements file. These are handled by bindep before being forwarded to dnf.
gcc
python3-libselinux [platform:redhat]
python3            [platform:dpkg]
The additional build steps section allows you to specify additional commands you can run either before (prepend) or after (append) the main build steps. The syntax must be either a list (as demonstrated by the sample definition file’s append section) or a multi-line text (as demonstrated in the prepend section).
---
version: 1
dependencies:
  galaxy: requirements.yml
  python: requirements.txt
  system: bindep.txt

additional_build_steps:
  prepend: |
    RUN pip3 install --upgrade pip setuptools
  append:
    - RUN ls -la /etc
Start the Build
Let’s run the build command and see what happens! The following execution-environment.yml file will be used to build an execution image with collections required to manage podman containers and to use ansible posix modules.
Ideally, you will create a separate directory with all the files described above. The following command will default to the execution-environment.yml file. The tag indicates the name of the image going to be built.
(Note: On Fedora and Red Hat servers, the ansible-builder will default to podman container engine. If another runtime should be used, it can be specific with —container-runtime switch: —container-runtime docker.)
Let's run the build command and see what happens! The following execution-environment.yml file will be used to build an execution image with collections required to manage podman containers and to use ansible posix modules.
Ideally, you will create a separate directory with all the files described above. The following command will default to the execution-environment.yml file. The tag indicates the name of the image going to be built.
(Note: On Fedora and Red Hat servers, the ansible-builder will default to podman container engine. If another runtime should be used, it can be specific with —container-runtime switch: —container-runtime docker.)
- Once the image is built, it can be verified by using the following command:
[root@aap01 builder-firewalld-container]# podman images
REPOSITORY                       TAG         IMAGE ID      CREATED         SIZE
localhost/podman_ee_image        latest      bffa0e361ef8  28 minutes ago  1.38 GB
<none>                           <none>      b45f24b19dd2  30 minutes ago  1.39 GB
<none>                           <none>      660c1af33d3b  32 minutes ago  819 MB
<none>                           <none>      9e080b619dd9  47 minutes ago  782 MB
<none>                           <none>      11cb3941f6c4  47 minutes ago  819 MB
<none>                           <none>      a961697e193a  53 minutes ago  782 MB
<none>                           <none>      54d20e308bfd  54 minutes ago  819 MB
localhost/vmware_ee_image        latest      591c14387c0a  8 days ago      1.68 GB
<none>                           <none>      38a134fd1b95  8 days ago      1.72 GB
<none>                           <none>      89b0325abbfd  8 days ago      824 MB
quay.io/ansible/ansible-runner   latest      bec0dc171168  2 months ago    816 MB
quay.io/ansible/ansible-builder  latest      b0348faa7f41  4 months ago    779 MB
- If you are interested in how the image was put together, you can use the following command:
podman inspect localhost/podman_ee_image- As you can see in the output above, the podman_ee_image has been successfully built. In case you have the Ansible Automation Hub node, you can use the following command to push it to the Hub:
podman login aap02.example.net
podman push <Image Id> aap02.example.net/podman_ee_image
podman push bffa0e361ef8 aap02.example.net/podman_ee_image
Getting image source signatures
Copying blob aadc47c09f66 skipped: already exists
Copying blob e0808177f5c4 skipped: already exists
Copying blob 699491b2659e skipped: already exists
Copying blob 6da2fb060681 skipped: already exists
Copying blob 5fa5c1c78a8e skipped: already exists
Copying blob 101e6c349551 skipped: already exists
Copying blob f8fd3a54d485 skipped: already exists
Copying blob d4df4b7e8eaf skipped: already exists
Copying blob 7dfd83b5170b skipped: already exists
Copying blob 32ad5db2dab5 skipped: already exists
Copying blob aa621dba5e87 skipped: already exists
Copying blob d32c18715b98 skipped: already exists
Copying blob a39c6baf08b1 skipped: already exists
Copying blob 1d211ae75d27 skipped: already exists
Copying blob 869dbc4797e2 skipped: already exists
Copying blob c3eeed63d6a9 skipped: already exists
Copying blob 2d4417eff75b skipped: already exists
Copying blob 22e51cce938f skipped: already exists
Copying blob 0e35fc86ad8c skipped: already exists
Copying blob 73373610159e skipped: already exists
Copying blob de0c9bd7ced9 skipped: already exists
Copying blob 5f70bf18a086 skipped: already exists
Copying config bffa0e361e done
Writing manifest to image destination
Storing signatures
- Verify if the image is visible in the AAP Hub’s configuration. Open the browser and navigate to your hub’s address:

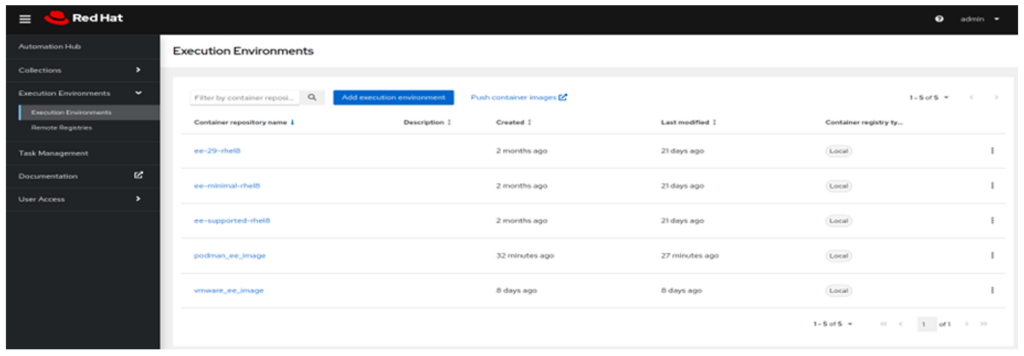
- In the Automation Hub, navigate to ‘Execution Environments’ > ‘Execution Environments’ and verify if podman_ee_image is visible:

The image is available.
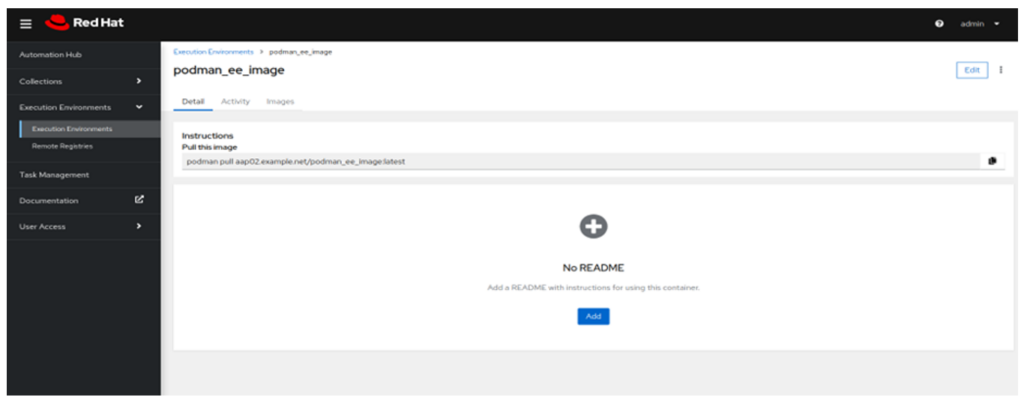
- Click on the image and navigate to the ‘Detail’ tab as indicated below:

- Copy the image name after ‘podman pull’:
aap02.example.net/podman_ee_image:latestYou will use it to configure the Execution Environment on the controller.
- Log into the Ansible Automation Controller node as admin and navigate to ‘Administration’ > ‘Execution Environments’. Click ‘Add’ and input the following configuration:

- Click ‘Save’.
- To use the image in the Template, navigate to the template with the playbook/role utilising the collections specified in the playbook and select ‘Execution Environment’:

- Save the configuration and launch the job. The first run might take more time as the controller will need to pull the execution image:

Conclusion
Now you’ve had chance to undertake this brief introduction on Ansible Builder, this officially concludes the guide. It really isn’t that bad of a process!
As always, if you have any questions on Ansible (or any other tech queries), please contact us.
Happy automating!


