Recently, I have spent significant time trying to use ansible to deploy an azure configuration. There are plenty of websites which describe the individual steps but either I could not find the ONE that encompasses them all or there simply isn’t one. I found this utterly frustrating.
So, what did I learn? – To temper my frustration and to provide some sanity to all who got frustrated before me – I decided to create this friendly blog.
So… what is it about? – In short – below are all the steps required to prepare a machine from which you will be running ansible playbooks to create stuff in the Azure Cloud.
So, let us begin.
1. Prepare a new machine. Do not install ansible as the installation will be covered later. If you install ansible from rpm, it might collide with the python ‘pip’ installation which pulls the latest packages and in some cases the installation might fail as it will find some older packages and libraries which it will not be able to remove.
2. Log into your machine (RHEL or CentOS) as root (or use sudo if need be) and install python pip:
curl https://bootstrap.pypa.io/get-pip.py -o get-pip.py
python get-pip.py
pip install kitchen
3. Install ansibe [azure]. This step will also install the latest version of Ansible, so installation of the ansible rpm is not necessary.
pip install ansible[azure]
if the pip is showing any incompatibilities, update the packages. For example:
adal 1.0.2 has requirement python-dateutil>=2.1.0, but you’ll have python-dateutil
1.5 which is incompatible.
pip install -U python-dateutil
Cannot uninstall ‘pyOpenSSL’. It is a distutils installed project and thus we cannot accurately determine which files belong to it which would lead to only a partial uninstall.
rpm -qa | grep -i pyopenssl
pyOpenSSL-0.13.1-3.el7.x86_64
rpm -e –nodeps pyOpenSSL-0.13.1-3.el7.x86_64
pip install pyOpenSSL
4. Repeat the installation of ansible[azure]:
pip install ansible[azure]
5. The next step is to install the Azure CLI ‘AZ’ on your machine which will give you the way to query Azure for the specific information … and you can also use the AZ to create configuration in Azure. To install AZ on your machine:
# rpm –import https://packages.microsoft.com/keys/microsoft.asc
# sh -c ‘echo -e “[azure-cli]nname=Azure CLI
nbaseurl=https://packages.microsoft.com/yumrepos/azure-clinenabled=1ngpgcheck=1
ngpgkey=https://packages.microsoft.com/keys/microsoft.asc” >
/etc/yum.repos.d/azure-cli.repo’
# yum install azure-cli
6. Login using ‘az’. This process is simple. Type az login in your preferred console and you will be directed to the web portal where you will enter your azure credentials. az will cache them and that’s it. ?
az login
- You can expect the following message:
Not able to launch a browser to login you in, falling back to device code…
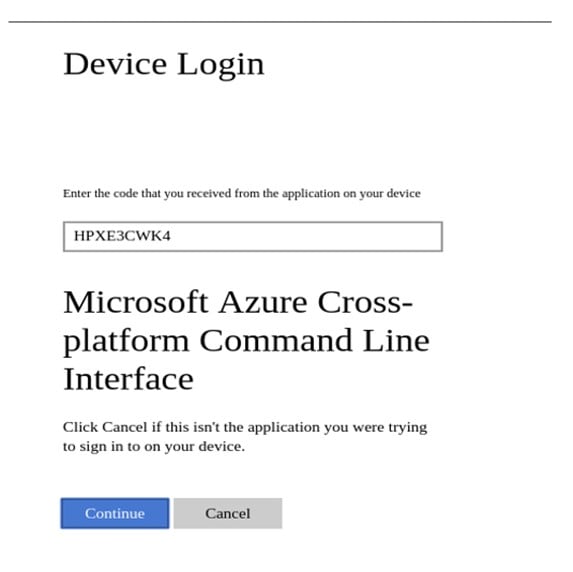
To sign in, use a web browser to open the page https://microsoft.com/devicelogin and enter the code HPXE3CWK4 to authenticate.
- Launch a browser, enter the URL provided in the message and authenticate using the code.

Once you click “Continue”, you will be taken to the portal.azure.com or login.microsoftonline.com. Authenticate using your azure credentials and … it’s done. Now you have the az superpowers. In the console you should expect something like:
[
{
“cloudName”: “AzureCloud”,
“id”: “e0254def-0000-00000-9743-54ed0fd77d58”,
“isDefault”: true,
“name”: “Pay-As-You-Go”,
“state”: “Enabled”,
“tenantId”: “00000000-39c2-4f1f-0000-8642e83b92b1”,
“user”: {
“name”: “name@outlook.com”,
“type”: “user”
}
}
]
7. It is now time to configure the credentials for ansible[azure]. More information about this can be found here: https://docs.ansible.com/ansible/devel/scenario_guides/guide_azure.html
Assuming you like to do everything from ‘root’, the credentials will be created for this user. If you do not assume superpowers, create the credentials file under the $HOME/.azure/credentials. ?
The credentials file has the following format:
[default]
subscription_id=xxxxxxx-xxxx-xxxx-xxxx-xxxxxxxxxxxx
client_id=xxxxxxx-xxxx-xxxx-xxxx-xxxxxxxxxxxx
secret=xxxxxxxxxxxxxxxxx
tenant=xxxxxxx-xxxx-xxxx-xxxx-xxxxxxxxxxxx
The idea is to find all the elements identified in the credentials file. Microsoft or Ansible folks did not make it easy and none of the parameters specified in the file matches the name in the azure portal configuration.
Let’s start with the subscription_id. This is probably the easiest part to find, however requires some searching. ?
8. Log in to the portal.azure.com
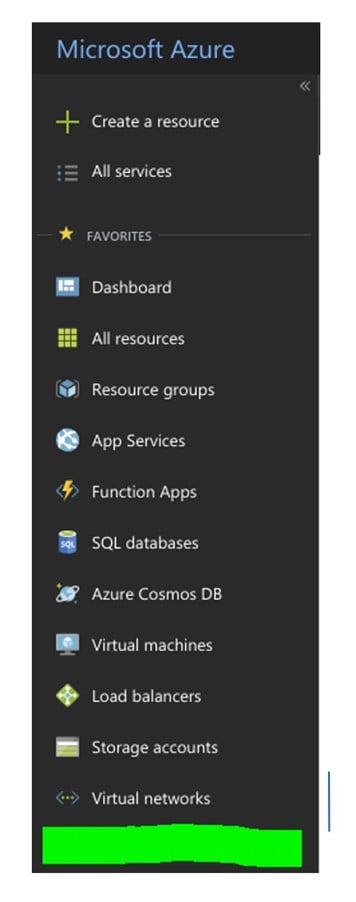
9. Verify if you have rights to actually do anything with Ansible. To verify that, click on the ‘Azure Active Directory’:

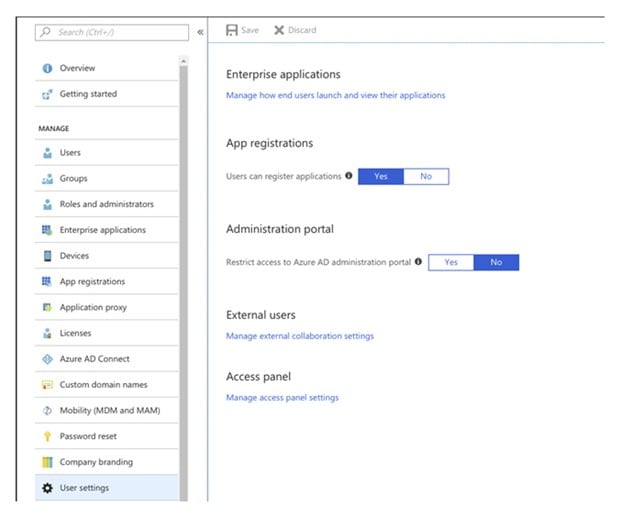
10. In the Azure Active Directory, click on ‘User Settings’ and verify if you can select ‘Yes’ for ‘users can register applications’:

If you cannot select ‘Yes’, that means you do not have permissions and it is time for a little chat with your admin, unless you are ‘The One’.
11. When you are sorted, find the subscription_id and tenant_id for our credentials file. In one of the previous steps we installed ‘az’ on your machine and if you followed those steps to the letter, you should be already logged in. Now it is enough to run the following to get the required information:
az account list -otable –query ‘[].{subscriptionId: id, name: name, isDefault:
isDefault, tenantId: tenantId, state: state, cloudName: cloudName}’
You can expect the following output:
| SubscriptionId | Name | IsDefault | TenantId | State | CloudName |
| e0254def-0000-00000-9743-54ed0fd77d58 | Pay-As-You-Go | True | 7b5ba730-0000-0000-0000-8600e83b92b1 | Enabled | AzureCloud |
12. Grab the SubscriptionId and TenantID and copy them to your credentials file.
13. The last step is to get client_id and secret… to do that, just use the following command:
az ad sp create-for-rbac –query ‘{“client_id”: appId, “secret”: password,
“tenant”: tenant}’
{
“client_id”: “1139aa32-0000-0000-0000-1230000850b7”,
“secret”: “84655b60-0000-0000-0000-200007960000”,
“tenant”: “7b5ba730-0000-0000-0000-8600e83b92b1”
}
14. Update your credentials file and we are ready to run some ansible.
15. The following are ansible playbooks that perform a few tasks. Firstly, I put all the variable into the variables section to easily modify the content. There are also a few other details that need to be addressed.
- The inventory file is not necessary as ansible is using the local azure api to run all the modules. As a result, both hosts and connections are set to localhost and local respectively.
- The playbook creates the following azure objects:
- Resource Group
- Vvirtual network
- Ssubnet
- Public IP
- Ssecurity group
- NIC
- Load Balancer
- Vvirtual machine
- The playbook is using tags to create everything
- The playbook is using tags to forcibly remove the entire resource group… so be careful what you remove. The playbook will not ask twice ?
- If you do not specify any tags, all the tasks will be run, and the resource group will be removed at the end.
- I added two playbooks below. The first playbook creates the configuration with the loadbalancer. Another one creates everything with the VM machine connected to the public IP, so you can log in using SSH from the outside
- If you create the playbook, called playbook.yml and want to create something, run the following:
ansible-playbook playbook.yml –tags create
- If you create the playbook, called playbook.yml and want to remove everything, run the following:
o If you create the playbook, called playbook.yml and want to remove everything, run the following:
Playbook with the loadbalancer:
—
– name: Create Azure VM
hosts: localhost
connection: local
vars:
– reg_grp: rg-austeast-web1
– reg_grp_location: australiaeast
– virt_net: vnet-web01
– virt_net_prefix: “192.168.0.0/16”
– subnet_name: subnet-web1
– subnet_net_prefix: “192.168.1.0/24”
– public_ip_name: pub-ip-web1
– sec_grp_name: nsg-web1
– virt_inst_size: Standard_D2s_v3
– vm_user_name: “your_username”
– vm_user_pass: “your_password”
– image_offer_name: CentOS
– image_publisher: OpenLogic
– image_sku: ‘7.5’
– virt_instance_name: azure-web1
tasks:
– name: Create Resource Group
azure_rm_resourcegroup:
name: “{{ reg_grp }}”
location: “{{ reg_grp_location }}”
tags:
– create
– name: Create VNET
azure_rm_virtualnetwork:
resource_group: “{{ reg_grp }}”
name: “{{ virt_net }}”
address_prefixes: “{{ virt_net_prefix }}”
tags:
– create
– name: Create subnet
azure_rm_subnet:
resource_group: “{{ reg_grp }}”
name: “{{ subnet_name }}”
address_prefix: “{{ subnet_net_prefix }}”
virtual_network: “{{ virt_net }}”
tags:
– create
– name: Create Public IP
azure_rm_publicipaddress:
resource_group: “{{ reg_grp }}”
allocation_method: Static
name: “{{ public_ip_name }}”
tags:
– create
– name: Create NSG with rules
azure_rm_securitygroup:
resource_group: “{{ reg_grp }}”
name: “{{ sec_grp_name }}”
rules:
– name: “{{ sec_grp_name }}-ssh”
protocol: Tcp
destination_port_range: 22
access: Allow
priority: 1000
direction: Inbound
– name: “{{ sec_grp_name }}-http”
protocol: Tcp
destination_port_range: 80
access: Allow
priority: 1001
direction: Inbound
tags:
– create
– name: Create a load balancer
azure_rm_loadbalancer:
name: “{{ reg_grp }}-lb1”
location: “{{ reg_grp_location }}”
resource_group: “{{ reg_grp }}”
# public_ip: “{{ public_ip_name }}”
probe_protocol: Tcp
probe_port: 80
probe_interval: 10
probe_fail_count: 3
protocol: Tcp
load_distribution: Default
frontend_port: 80
backend_port: 8080
idle_timeout: 4
natpool_frontend_port_start: 1030
natpool_frontend_port_end: 1040
natpool_backend_port: 80
natpool_protocol: Tcp
backend_address_pools:
– name: backendpool1
frontend_ip_configurations:
– name: frontendpool1
public_ip_address: “{{ public_ip_name }}”
tags:
– create
– name: Get facts for one load balancer
azure_rm_loadbalancer_facts:
name: “{{ reg_grp }}-lb1”
resource_group: “{{ reg_grp }}”
tags:
– create
– createnic
– name: Create NIC
azure_rm_networkinterface:
resource_group: “{{ reg_grp }}”
name: “{{ reg_grp }}-nic1”
virtual_network: “{{ virt_net }}”
subnet: “{{ subnet_name }}”
security_group: “{{ sec_grp_name }}”
ip_configurations:
– name: ipconfig1
load_balancer_backend_address_pools: “{{ azure_loadbalancers[0].properties.backendAddressPools[0].id }}”
tags:
– create
– createnic
– name: Create VM
azure_rm_virtualmachine:
resource_group: “{{ reg_grp }}”
name: “{{ virt_instance_name }}”
vm_size: “{{ virt_inst_size }}”
admin_username: “{{ vm_user_name }}”
admin_password: “{{ vm_user_pass }}”
ssh_password_enabled: true
network_interfaces: “{{ reg_grp }}-nic1”
image:
offer: “{{ image_offer_name }}”
publisher: “{{ image_publisher }}”
sku: “{{ image_sku }}”
version: latest
tags:
– create
– createvm
– name: Delete a resource group
azure_rm_resourcegroup:
name: “{{ reg_grp }}”
state: absent
force: yes
tags:
– remove
Playbook with the VM connected to the public IP:
—
– name: Create Azure VM
hosts: localhost
connection: local
vars:
– reg_grp: rg-austeast-web1
– reg_grp_location: australiaeast
– virt_net: vnet-web01
– virt_net_prefix: “192.168.0.0/16”
– subnet_name: subnet-web1
– subnet_net_prefix: “192.168.1.0/24”
– public_ip_name: pub-ip-web1
– sec_grp_name: nsg-web1
– virt_inst_size: Standard_D2s_v3
– vm_user_name: your_user
– vm_user_pass: “your_password”
– image_offer_name: CentOS
– image_publisher: OpenLogic
– image_sku: ‘7.5’
– virt_instance_name: azure-web1
tasks:
– name: Create Resource Group
azure_rm_resourcegroup:
name: “{{ reg_grp }}”
location: “{{ reg_grp_location }}”
tags:
– create
– name: Create VNET
azure_rm_virtualnetwork:
resource_group: “{{ reg_grp }}”
name: “{{ virt_net }}”
address_prefixes: “{{ virt_net_prefix }}”
tags:
– create
– name: Create subnet
azure_rm_subnet:
resource_group: “{{ reg_grp }}”
name: “{{ subnet_name }}”
address_prefix: “{{ subnet_net_prefix }}”
virtual_network: “{{ virt_net }}”
tags:
– create
– name: Create Public IP
azure_rm_publicipaddress:
resource_group: “{{ reg_grp }}”
allocation_method: Static
name: “{{ public_ip_name }}”
tags:
– create
– name: Create NSG with rules
azure_rm_securitygroup:
resource_group: “{{ reg_grp }}”
name: “{{ sec_grp_name }}”
rules:
– name: “{{ sec_grp_name }}-ssh”
protocol: Tcp
destination_port_range: 22
access: Allow
priority: 1000
direction: Inbound
– name: “{{ sec_grp_name }}-http”
protocol: Tcp
destination_port_range: 80
access: Allow
priority: 1001
direction: Inbound
tags:
– create
– name: Create NIC
azure_rm_networkinterface:
resource_group: “{{ reg_grp }}”
name: “{{ reg_grp }}-nic1”
virtual_network: “{{ virt_net }}”
subnet: “{{ subnet_name }}”
public_ip_name: “{{ public_ip_name }}”
security_group: “{{ sec_grp_name }}”
tags:
– create
– name: Create VM
azure_rm_virtualmachine:
resource_group: “{{ reg_grp }}”
name: “{{ virt_instance_name }}”
vm_size: “{{ virt_inst_size }}”
admin_username: “{{ vm_user_name }}”
admin_password: “{{ vm_user_pass }}”
ssh_password_enabled: true
network_interfaces: “{{ reg_grp }}-nic1”
image:
offer: “{{ image_offer_name }}”
publisher: “{{ image_publisher }}”
sku: “{{ image_sku }}”
version: latest
tags:
– create
– createvm
– name: Delete a resource group
azure_rm_resourcegroup:
name: “{{ reg_grp }}”
state: absent
force: yes
tags:
– remove


