Hey folks! Pure Awesomeness here and after what felt like an eternity since my last blog post, I’m back. Back once again to pump as much knowledge as humanly possibly into your cerebrum about the ever-expanding world of Microsoft 365.
So, what am I going to talk to you about today? Based on my past blog posts, you’re probably thinking it’s going to be something around mail and identity. Not quite but don’t panic. Hear me out. Whilst this blog post contains some aspects of mail, the primary focus is going to be the wonder that is Multi Geo! I’ll take you through what it is and how to implement it across your environment.
Before we begin, I need you to do a few things for me:
- Grab a cup of liquid gold, aka coffee
- Like and share my previous blogs and FastTrack updates
- Sign up to Insentragram…yes I know it’s been a while but you knew this was coming
So, what now? Take a sip of that liquid gold and be prepared to be amazed with the wonders of Multi Geo. Buckle up and here we go!
WHAT IS MULTI-GEO?
Picture this if you will – a global organisation, operating out of Europe and the US, has a strict data compliance/residency policy, along with GDPR requirements, but is using Microsoft 365 services from a single tenancy located in Australia. By the way, Australia is where their head office is located.
Clearly this scenario doesn’t meet any of their requirements. The solution? Multi-Geo, but, yes there’s always a but…it does require additional licenses to be provisioned (which I’ll talk about a bit later) within the central tenant as Multi-Geo licenses are not part of the usual enterprise SKUs.
Multi-Geo only applies to Exchange Online (EXO), SharePoint Online (SPO) and OneDrive for Business (ODfB) (Teams is coming! – queue Carlton Dance!)

So, getting down to what Multi-Geo actually is…the configuration allows an admin to provision another SharePoint Online tenant in a different region around the world and allow users to have their EXO mailboxes hosted in the same region. This in turn allows organisations to meet their data residency/GDPR requirements by allowing SPO/ODfB/EXO data to be stored in the region closest to their satellite office.
Microsoft has a list of published regions where Multi-Geo can be enabled so make sure you look into this list carefully to ensure you pick the right region. I know what you’re asking – Where can I find the list of regions?” Now what kind of blog post would this be if I didn’t share the link with my loyal followers?
Add this link to your Bookmarks (or Collections, if you’re using Edge Chromium – I hope you are by now!) – Microsoft 365 Multi-Geo – Microsoft 365 Enterprise | Microsoft Docs
HOW TO ENABLE THE MULTI-GEO REGIONS
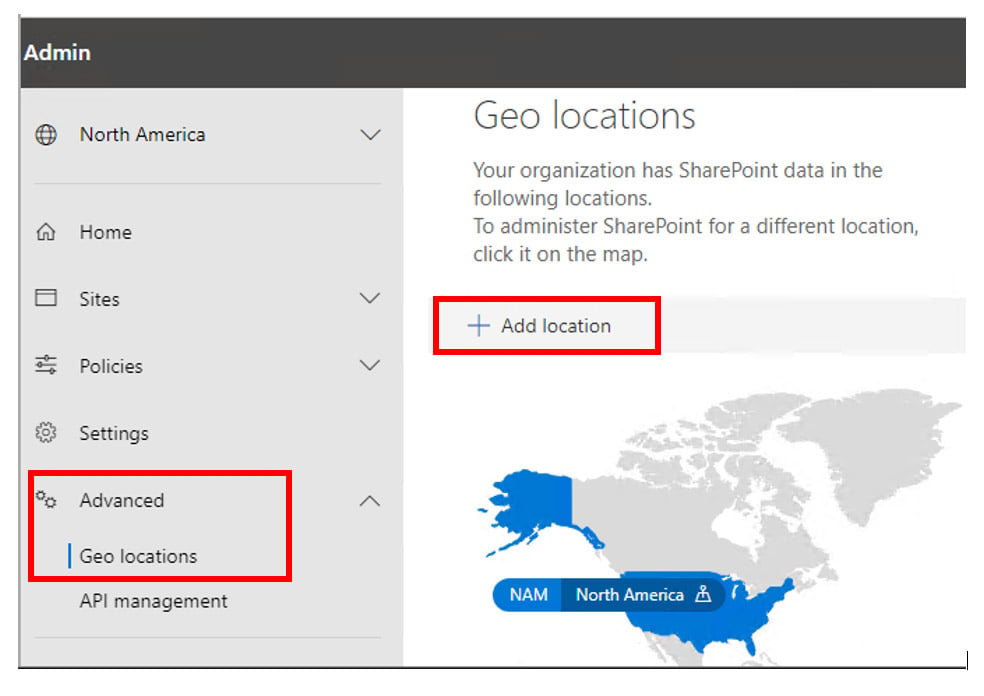
Once the licenses are available in your tenant (they don’t need to be assigned to anyone just yet), log into the SPO Admin Centre and expand Advanced and then click on Geo Locations and then click Add Location (refer to the work of art screen shot below)
Next, select a region and then click Next and add in a domain name. This is what’s going to be placed in front of the SPO admin and ODfB URLs (e.g. https://contosoUK.sharepoint.com and https://contosoUK-my.sharepoint.com) – for the purposes of this blog, I’ve selected United Kingdom as my Multi-Geo region.
If you’re looking at deploying multiple regions, my recommendation would be to add the region (or country) abbreviation to the default domain so it’s easier for your administrators to distinguish which region they’re logged into.
Once you click Add, you’ll then receive the below message:
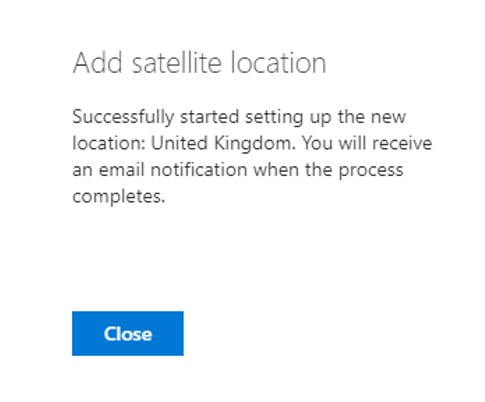
Once the satellite site has been provisioned, back under the Geo Locations tab in the SPO Admin Centre, you should now see the additional region. . By clicking on the new region, you’ll be taken to a new SPO Admin Centre where you can then control separate external sharing policies specific for that region.
OK, so the region has been set up. Is that it? Not quite. Allow me to take you through the fun stuff now of configuring Multi-Geo for your users.
PREFERRED DATA LOCATION
Wait. What? But I thought I’d already set my location in the steps above. Well, you have but now you need to ensure your user identities have the Preferred Data Location (PDL because we all love acronyms) set.
So, how do you do it? Firstly, if you’re running a Windows Server 2019 schema across your Active Directory infrastructure, you’re in luck. This schema has an attribute built into the user account for the PDL, which can be easily set. You can then configure AAD Connect to synchronise this attribute to Azure AD. You’ll only need to complete this step if you’re running and it is recommended to disable the sync scheduler so you don’t get any surprise changes being exported to Azure AD midway through your configuration.
AAD Connect version 1.4.18 and newer syncs the attribute by default, so there’s no need to manually add it into the scheduler.
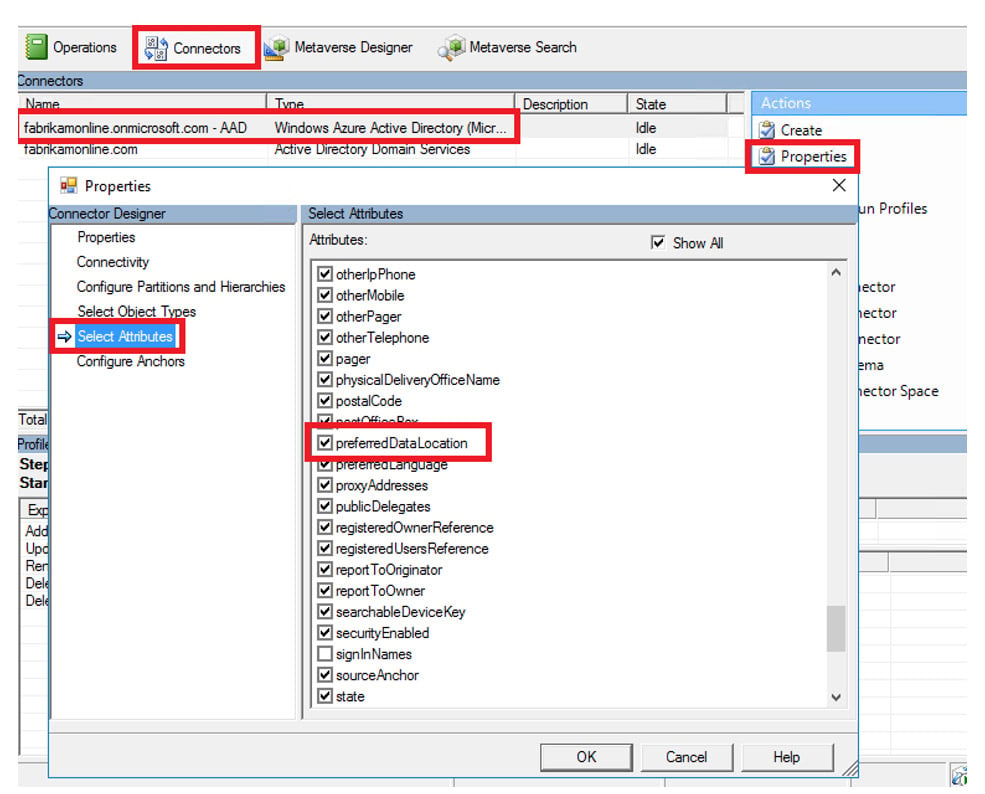
If you’re not running a Windows Server 2019 schema, here’s where it gets a little interesting. You’ll need to configure the Multi-Geo region using one of the extensionAttributes in on-premises AD and then configure new custom inbound and outbound sync rules in AAD Connect so this attribute is then synchronised to Azure AD. Still with me? OK, sit up because now we get into the really technical stuff.
So, what do I set the value to for the ? Well my loyal apprentice, if you recall back to the link in this blog around the Multi-Geo regions available, you’ll notice that each region has a three letter code (e.g. EUR). This is the value you need for the attribute as this is the value that’s set as the PDL to then provision the libraries and mailboxes in the correct region.
If you’re using the built-in attribute as part of your Windows Server 2019 schema, the PDL value needs to match the Multi-Geo region code as well.
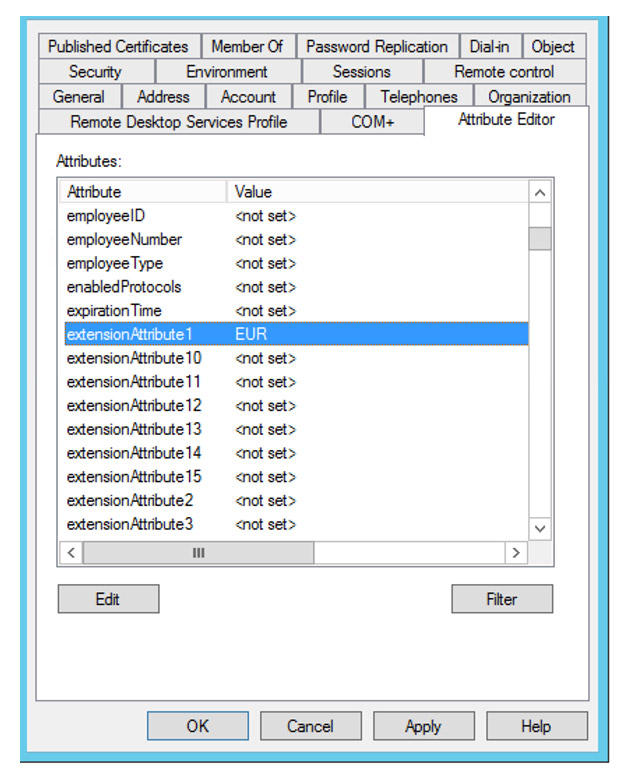
OK, attribute set. What’s next? AAD Connect sync rules of course. Launch the AAD Connect Synchronisation Rule Editor.
SYNCHRONISATION RULES
The first thing you need to do is create a new inbound synchronisation rule, which will allow for the attribute to sync from the on-premises AD to the metaverse.
Next, create a new outbound synchronisation rule, which will allow the attribute to sync from the metaverse to the PDL attribute in Azure AD.
The configuration details for both the inbound and outbound sync rules can be found here – Azure AD Connect: Configure preferred data location for Microsoft 365 resources | Microsoft Docs
Once complete, run a full synchronisation cycle to bring the attribute for users from on-premises to Azure AD. Of course, test this out first to ensure your custom synchronisation rules are working as expected.
So how do I know it worked as expected? Take a sip of that liquid gold again and let’s now dive into how you can verify things are working.
VERIFY THE PDL IN AZURE AD
It’s pretty simple actually. No complex scripts to run or the need to jump through multiple Graphical User Interfaces (GUI – remember…we love acronyms).
Launch a PowerShell window and connect to your Microsoft 365/Azure AD instance using the Connect-MsolService cmdlet. Enter in your admin username and your super secure password (if your password is Password123 or HomerSimpsonforPresident, we need to talk!)
Once connected, run the following command for a user who you set the attribute for:
- Get-MsolUser -UserPrincipalName <UPN> | select PreferredDataLocation
The output you should hopefully see will be the Multi-Geo region’s code now populated against the PreferredDataLocation attribute in Azure AD

MICROSOFT 365 WORKLOADS
Now you’ve confirmed the PDL is set, what’s next? You’ll now need to license your users with the Multi-Geo license. You will have the option of assigning the below two licenses to your users who need to be enabled with Multi-geo features:
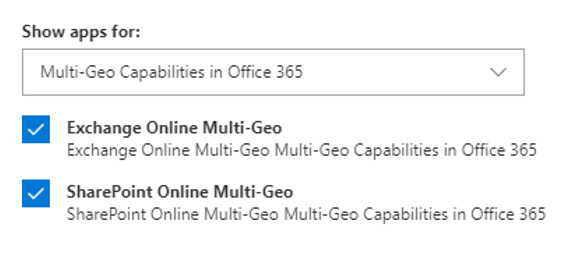
Once applied, this is where the magic happens and take note of the below sequence of events:
- If the license is applied before the ODfB library is provisioned, the back-end process will provision the ODfB library for the Multi-Geo enabled user in the region set as per the PDL
- If the license is applied after the ODfB library is provisioned, the admin will have to manually move the library to the new region and the best part about this process – no impact to the end user! Since I’m just purely awesome, I’ll provide you the cmdlets you need to move the library:
- Connect to the SPO service in the user’s current geo location
- Connect-SPOService -url https://<tenantnane>-admin.sharepoint.com
- Start the ODfB move
- Start-SPOUserAndContentMove -UserPrincipalName <UPN> -DestinationDataLocation <RegionCode>
- If the license is applied before the EXO mailbox is provisioned, the back-end process will provision the EXO mailbox for the Multi-Geo enabled user in the region set as per the PDL
- If the license is applied after the EXO mailbox is provisioned, the mailbox is moved automatically and again, no impact to the end user. As an admin, you can confirm the location of the mailbox by running the below cmdlet (after connecting to EXO using PowerShell of course)
- Get-Mailbox -Identity <MailboxIdentity> | Format-List Database,MailboxRegion*
- If MialboxRegion outputs the correct region, you’re good to go!
- Connect to the SPO service in the user’s current geo location
That’s a wrap! Hopefully this blog has provided you with the information you need to deploy Multi-Geo across your tenant.
Until next time, Pure Awesomeness signing off.
If you talk about it, it’s a dream, if you envision it, it’s possible, but if you schedule it, it’s real – Tony Robbins


