On-premises Exchange server migrations are straight forward enough (when technology behaves itself) but then you come across a new Exchange migration project where two words pop out of the scope and slap you right across the face…CROSS FOREST. Before you proceed to understand the scope, you already know that the overall complexity has multiplied by 10. You then continue to read through the scope and then another two words jump out …MULTI-TENANT. You now have four words Exchange consultants fear…CROSS FOREST, MULTI-TENANT.
Congratulations, your Exchange migration project has now hit a complexity level of Draconian! But do not fear trusted Exchange consultant, there is light at the end of the tunnel and throughout this blog, I’ll show you how to get your mailboxes from source to target using a straight forward approach.
Recently, I guess you could say I was lucky enough, due to my pure awesomeness (so I keep telling myself), to be assigned an Exchange cross-forest migration with a touch of multi-tenancy. What made this migration just that little bit more different is- I had to migrate user mailboxes from the source into linked mailboxes in the target AND to top it off, it was an Exchange 2007 source environment being migrated into an Exchange 2013 target environment. So where do you start?
PREREQUISITES
Before you even begin to run the first command to migrate the first mailbox, you need to make sure some very important prerequisites are in place. These will ensure you’re able to pass the first hurdle of even getting your identities across to the target forest.
Without the networking in place, you can forget about doing anything. The source domain and target domain need to be able to communicate with one another for starters. Secondly, firewall ports need to be open between both source and target forests to ensure a) name resolution takes place b) identities can be prepared c) you can actually move the mailbox. What ports are required I hear you ask? Now what kind of blog would this be if I didn’t let you know what these ports were.
| Port | Protocol |
| TCP 808 | Mailbox Replication Service uses to communicate |
| TCP 53 | DNS |
| TCP 135 | RPC End Point |
| TCP 389 | LDAP |
| TCP 3268 | LDAP |
| TCP 88 | Kerberos |
| TCP 445 | Microsoft DS Service (File Sharing) |
| TCP 443 | Mailbox Replication Proxy uses port 443 to communicate with other Exchange CAS servers via HTTPS |
| TCP 25 | Mail flow between the two organisations |
| ICMP | Exchange organisations need to communicate with one another |
Don’t forget that Conditional Forwarders need to be set up in the internal DNS in both environments to ensure name resolution.
Domain Trusts
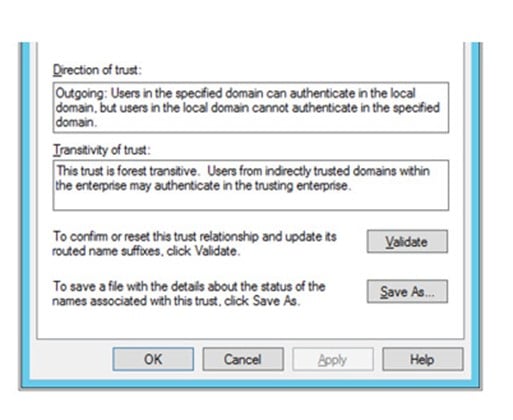
Domain trusts are self-explanatory. Users in the source need to authenticate with resources in the target and vice versa. But the question remains on what type of trust is required for cross forest migrations. Well, in my experience, a one-way, incoming forest trust from source to target and a one-way, outgoing forest trust from target to source are all that is required. Both trusts being forest transitive, which is basically a two-way relationship

MRS Proxy
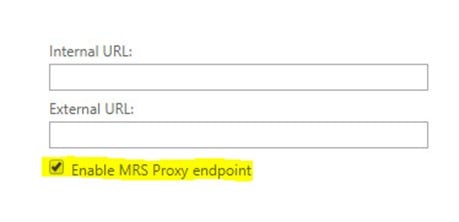
Mailbox Replication Service Proxy – you could have all your networking and domain perquisites in place but if you don’t have this bad boy enabled and running, you can forget about trying to move a mailbox. One thing to remember, the MRS Proxy needs to be enabled on both source and target Exchange organisations, however, in my case, given that the source was an Exchange Server 2007 organisation, the MRS Proxy doesn’t exist, so it was only enabled on the target, which was fine as it still allowed me to carry on with the tasks I needed.
There are two ways of enabling the MRS Proxy: Exchange Control Panel (ECP) or Exchange Management Shell (EMS).
ECP
Servers – Virtual Directories – EWS (Default Web Site) – Enable MRS Proxy endpoint

EMS
Set-WebServicesVirtualDirectory -Identity “Server NameEWS (Default Web Site)” -MRSProxyEnabled $true
PREPARING IDENTITIES
Now the fun part begins. Once you’ve confirmed all the prerequisites have been met, it’s now time to get dirty and hammer your PowerShell session with a number of in-built cmdlets that are going to help get your entire finance department from the source forest to the target forest.
First thing you need is a script. Don’t panic, you don’t need to create one from scratch. Microsoft has already prepared one earlier and is located under the scripts directory of your target Exchange server. In my scenario, Exchange 2013. Unless you placed the system files in a different directory, the scripts folder should be in C:Program FilesMicrosoftExchange ServerV14Scripts. Now look for a script called Prepare-MoveRequest.ps1. Now take a copy of it and place it somewhere easy to get to, like your Desktop.
Launch the Exchange Management Shell. Remember, you’re doing this from the target Exchange server! Once the shell has launched, change the directory to reference your desktop.
Before we move on, we want to capture the source and target credentials in separate variables to make life just that little bit easier.
In the same shell, enter in the below cmdlets:
$remote = Get-Credential. In the pop up, enter in the source forest credentials. Remember, this account needs full access to the source forest and also the source Exchange organisation.
Once done, enter the below cmdlets:
$local = Get-Credential. In the pop up, enter in the target forest credentials. Remember, this account needs full access to the target forest and also the target Exchange organisation
And now the magic begins…
Find a test account to use as your guinea pig – e.g. userA@forestA.com.au
In the same shell you have open, enter in the below cmdlets:
[PS] C:UsersAdminDesktop>.Prepare-MoveRequest.ps1 -RemoteForestDomainController “FQDN of Domain Controller in source forest” -RemoteForestCredential $remote -LocalForestDomainController “FQDN of Domain Controller in target forest” -LocalForestCredential $local -TargetMailUserOU “DN of target OU” -LinkedMailUser -Identity userA@forestA.com.au
Now remember in my scenario, I’m migrating user mailboxes from the source to linked mailboxes in the target, hence why I need to include the -LinkedMailUser parameter. You won’t need this parameter when your preparing Resource mailboxes.
Now once you’ve run the above 4000 word cmdlet, the output you’re going to see will hopefully be in green and will confirm the appending of the required X500 addresses from both the source and target and once complete, you’ll see the result of 1 mailbox<s> ready to move – you can now breathe again!
To confirm everything is ready to go for the next phase, launch Active Directory Users and Computers in the target forest and locate the OU that you references as the -TargetMailUserOU. If your test account appears in here as a disabled account (again, remember I prepared the identity as a LinkedMailUser, hence why it’s disabled in the target) you’re almost there. Check the attributes and make sure the following attributes are populated:
- proxyAddress
- LegacyExchangeDN
- targetAddress
If these are all populated with the correct values, pass GO, collect your $200 and get ready for phase 2!
MAILBOX MIGRATION
So now you’re asking yourself “OK, so the identity made its way to the target forest in some way, shape or form. Now how do I move the mailbox?”
Easy…sort of…It requires another 4000-word cmdlet to be run.
In the same shell (remember you’ve still got the $remote and $local variables saved in this session), run the following:
[PS] C:UsersAdminDesktop>New-MoveRequest -Identity userA@forestA.com.au -RemoteLegacy -RemoteGlobalCatalog “FQDN of Domain Controller in source forest” -TargetDeliveryDomain “forestA.com.au” -TargetDatabase “Database name where the mailbox is moved to” -RemoteCredential $remote
One thing to remember, the mailbox database you specify doesn’t need the .edb extension.
If the cmdlets are all happy, the result will be that your test mailbox will now enter the Queued state and depending on the amount of data within it that needs to be transferred, it should change to InProgress pretty quickly. A simple Get-MoveRequest will provide you with the status.
Once the move status reaches Completed, two things will happen:
- The source mailbox will be converted to a mail-enabled user and the targetAddress attribute will be set accordingly
- The target mailbox will become active as a Linked Mailbox
To test and make sure it worked the way you hoped, launch OWA for the target Exchange organisation and log in as the migrated user. Now because in my scenario I prepared the identity as a LinkedMailUser and the mailbox in the target is now a Linked Mailbox, I’m going to be logging onto OWA with the user’s source credentials. E.g. SOURCEFORESTuserA.
Also, don’t forget, in my scenario, I was also migrating to a multi-tenant platform, so to ensure all the proper segregation still occurs, the required address book policies and attributes were set on the migrated mailbox…but that’s for another blog.
Tune in next time where I’ll show you more of the joys of cross-forest Exchange migrations.


