Hi guys, yep it’s me again…the pure awesomeness that got you through the cross forest migrations. Just when you thought your cerebrum, you know, the large part of your brain that does all the thinking, had just been taken through its paces with trying to memorise cross forest migrations, along comes me again! This time around, I’ll take you through the implementation of a multi-tenant Exchange organisation because you know, somewhere along the evolution of email and Exchange platforms, someone thought it would be a splendid idea to be able to host more than one organisation on the same platform! (cue the million dollar question of “why?” whilst inserting the crying emoji”)
Easy. Consultants like you and I make the world go around. Our knowledge and expertise of email and Exchange platforms is what helps your finance department send out those all important pay slips so you can finally decide on whether you can splurge on that Tesla you’ve always wanted…unless Elon Musk decides to launch more into space, depleting the Aussie stock of the Model S leaving you with no choice but to purchase a Japanese model electric car whose name we shall not mention. More on electric cars later. Continuing with the topic of the day…multi tenancy and how in the world this ties in with an on-premises Exchange deployment.
Read on my loyal apprentice.
I’ve been labelled a mad man for even attempting to deploy a multi-tenant solution but hey, the knowledge built up in my cerebrum needs to be transferred to my fellow Exchange consultants before we get taken over by AI (we’ve all seen I, Robot!)
So, you purely awesome mad man, tell us how to deploy a multi tenant Exchange platform!
Here we go!
One thing to remember is that deploying an Exchange 2013/2016 multi tenant solution isn’t as difficult as you might think. It’s nothing compared to the days of Exchange 2010. With 2013/2016, you can actually get things done via the GUI, BUT (and yes, it’s a big BUT), most of the configuration still needs to be done using PowerShell. Oh did you think we were done with PowerShell commands? You’re an Exchange consultant. PowerShell is life!
If you recall back to my first blog, The Mother of All Cross Forest Migrations, I provided you with two sets of PowerShell commands containing approx. 4000 cmdlets each. Well, with multi tenant, you’re looking at approx. 4523 cmdlets (in total) so slightly less than cross forest moves but still enough to cause irregular heart beats and loud breathing once you read on and see what the commands are. Don’t worry, I’m here to help!
ACTIVE DIRECTORY
There’s two ways you can do this:
- Set up Exchange and the required accounts in a standard Account Forest
- Set up Exchange in a Resource Forest and active accounts in an Account Forest, connected via the required trusts with Linked Mailboxes
Organisational Units
First thing to do before you even attempt to run setup.exe to install Exchange is to make sure your Active Directory Organisational Unit (OU) structure is up to scratch. If your customers are going to be logging onto a root domain, you want to make sure the OU structure is segregated. You don’t want customers A, B and C all located in an OU called “Users” just because you were preoccupied with trying to finally crack the Magicians Code on Channel 10 and didn’t create the proper OU structure, which results in your colleague trying to differentiate between who belongs to customer A, B or C 6 months’ down the track.
In a nutshell, if you’re hosting all your customers under a root domain, you want them segregated in separate OUs to make your administration life easier, kind of like the artwork presented below (Good ol’ Visio never disappoints!)
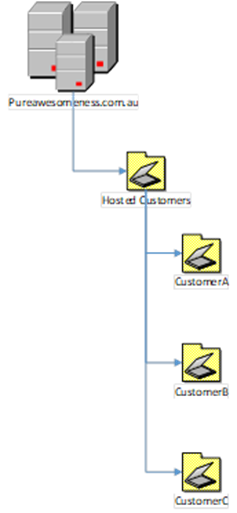
Now, no one will think differently of you if you decide to create your OU structure directly from Active Directory Users and Computers, however, if you decide to create it through PowerShell, not only will you be deemed Superior by your colleagues, but you will automatically be upgraded to next level God Mode status.
This is the part where you tell us what the commands are, right? What kind of blog post do you think this would be if I didn’t!
On your Domain Controller, launch PowerShell and run the following command to create the OU that will hold all the data (i.e. the parent OU):
- New-ADOrganizationalUnit -Name “Hosted Customers” Next, you want to create the child OUs within the parent OU to start segregating Customers A, B and C:
- New-ADOrganizationalUnit -Name “Hosted Customers” -Path “OU=CompanyA,OU=Hosted Customers,DC=pureawesomeness,DC=com,DC=au”
User Principal Names
Next, you’ll want to start adding in the required UPN suffixes to the AD Forest so that your customers can log in using their desired UPNs (e.g. user1@domain.com.au). Referring back to on one of my previous blogs, The Mother of All Cross Forest Migrations, I was working in an Account/Resource Forest scenario, so the UPNs weren’t added in AD in the target forest as users were all authenticating with accounts in the source forest using Linked Mailboxes.
Confused yet? I’ll try and simplify it for you here…
If you’re soon to be multi-tenant Exchange platform is going to reside in the same forest as your active accounts and you want your customers to log in with their own domain name, run the below command on the Domain Controller:
- Set-ADForest -Identity “Your local AD Domain” -UPNSuffixes @{add=”domain.com.au”}
Next up, the all important installation of Exchange. I won’t write about the installation process here but it’s basically Next, Next, Next, finish Season 1 of Suits, make a cup of coffee, drink said cup of coffee, come back, reboot server and you’re done! Well sort of…then there’s the basic configuration of the Exchange platform, which guess what, I’ll outline for you in another blog post…only if you subscribe to Insentragram. Oh, as if you didn’t see that one coming ?
Right, so Exchange installed, basic configuration done and now, the juicy part…configuring the platform for multi-tenancy. Strap yourselves in!
ADDRESS BOOK POLICY ROUTING AGENT
Basically, this bad boy tells the users on your Exchange platform which Global Address List they are only allowed to look up. If you don’t want the users who reside in GAL1 to see GAL2 users as external contacts, install the Address Book Routing (ABR) Agent on the Exchange server. Don’t forget to enable it after install. As if trying to say Address Book Policy Routing Agent wasn’t hard enough, now you must not only install it, but enable it! You’re probably panicking now thinking “he’s not going to tell us how to do this!”…Take a few deep breaths and proceed to read and guess what…it consists of PowerShell! (this is either a face palm or an Evan Almighty Happy Dance moment)
- Launch the Exchange Management Shell and run the following –
Install-TransportAgent -Name “ABP Routing Agent” -TransportAgentFactory “Microsoft.Exchange.Transport.Agent.AddressBookPolicyRoutingAgent.AddressBookPolicyRoutingAgentFactory” -AssemblyPath $env:ExchangeInstallPathTransportRolesagentsAddressBookPolicyRoutingAgentMicrosoft.Exchange.Transport.Agent.AddressBookPolicyRoutingAgent.dll
Next, enable the Transport Routing agent:
- Enable-TransportAgent “ABP Routing Agent”
Once done, restart the transport service and verify the ABP Routing agent has been installed:
- Restart-Service MSExchangeTransport
- Get-TransportAgent
- The ABP Routing Agent should be listed
Final step is to enable the ABP Routing Agent
- Set-TransportConfig -AddressBookPolicyRoutingEnabled $true

Now, quick checklist
- Exchange installed ✔
- ABP Routing Agent installed ✔
- Cup of liquid gold consumed ✔
Proceed to the next phase of your training…
EMAIL ADDRESS POLICY
Don’t worry, this can be done from the Exchange Admin Centre (I can almost hear you cheering with joy!)
First thing you want to do is create a new Email Address Policy, so the accounts get assigned the correct email addresses because you know, assigning user1 at Company A with a Company B email address is not the greatest thing you could do.
Log into your Exchange 2016 EAC and browse to Mail Flow – Email Address Policies and click on the + symbol
- Give the policy a name that’s easily distinguishable from the others
- Use abbreviations, acronyms, whatever you wish

- Set the email address format and make sure you select the correct accepted domain
- g. alias
- Make sure types of recipients is set as All recipient types (unless there’s a specific reason you don’t want the policy applied to all types)
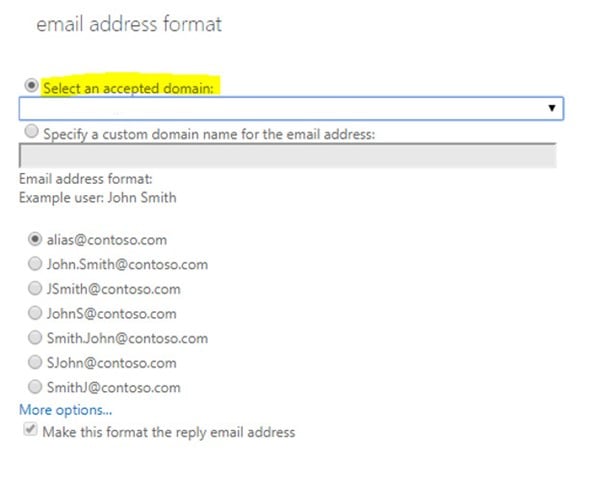
- Make sure types of recipients is set as All recipient types (unless there’s a specific reason you don’t want the policy applied to all types)
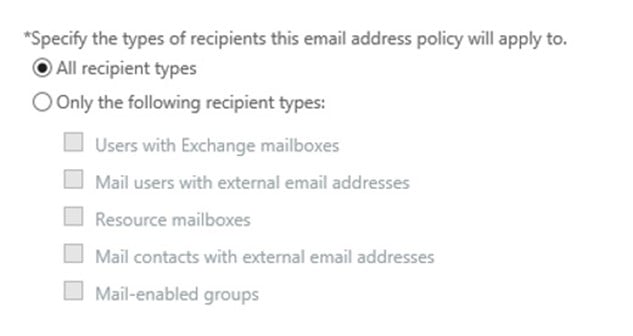
- Next, click on Add a rule and from the drop down list, select Recipient Container and then select the OU you want to apply the policy to.
- Click Save and BOOM! Email Address Policy created BUT (there’s always a BUT), don’t forget to apply it. By default, email address policies aren’t applied. Administrators need to manually apply it (just in case you made a slight boo boo and applied it to the wrong OU!) So double check the settings of the policy before applying and read the prompts you’re presented with! They’re labelled Warning for a reason.
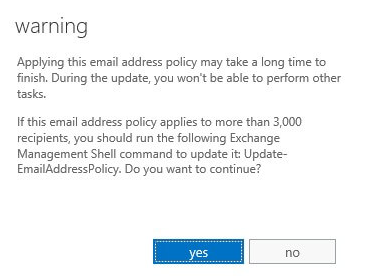
You’re on the home stretch now…I promise…maybe…not really…only joking…but seriously…HOME STRETCH!!
ADDRESS LISTS AND POLICIES
Buckle up because there’s 4523 PowerShell cmdlets to run and that’s just for one customer! Feel free to scream if need be. I’m all ears.
First, we want to create a new Global Address List:
- New-GlobalAddressList -Name “Global Address List CompanyA” -ConditionalCustomAttribute1 “Attribute1” -IncludedRecipients MailboxUsers,MailGroups,MailContacts -RecipientContainer “pureawesomeness.com.au/Hosted Customers/CompanyA”
Few things to take note of:
- Replace CompanyA with the customer you’re creating the GAL for (e.g. CompanyB, CompanyC etc)
- Make sure you enter the correct path for the OU as you want the GAL assigned to all recipients in that particular OU and not the wrong one!
- CustomAttribute1 is what we’re going to use to assign the policies correctly to the accounts so when the objects are created in Exchange and in AD, don’t forget to assign the correct attribute
- The value of CustomAttribute1 can be anything you want – just make sure it’s different across all your customers (e.g. you don’t want the same value for CompanyA assigned to objects in CompanyB)
Next up, we want to create the Address Lists for Users, Contacts, Distribution Groups and Rooms:
- New-AddressList -Name “All Rooms CompanyA” -RecipientFilter “(CustomAttribute1 -eq ‘Attribute1’) -and (ResourcePropertiesDisplay -eq ‘Equipment’ -or ResourcePropertyDisplay -eq ‘Room’)” -RecipientContainer “pureawesomeness.com.au/Hosted Customers/CompanyA”
- New-AddressList -Name “All Users CompanyA” -RecipientFilter “(CustomAttribute1 -eq ‘Attribute1’) -and (ObjectClass -eq ‘User’)” -RecipientContainer ” pureawesomeness.com.au/Hosted Customers/CompanyA”
- New-AddressList -Name “All Contacts CompanyA” -RecipientFilter “(CustomAttribute1 -eq ‘Attribute1’) -and (ObjectClass -eq ‘Contact’)” -RecipientContainer ” pureawesomeness.com.au/Hosted Customers/CompanyA”
- New-AddressList -Name “All Distribution Lists CompanyA” -RecipientFilter “(CustomAttribute1 -eq ‘Attribute1’) -and (ObjectClass -eq ‘Group’)” -RecipientContainer “pureawesomeness.com.au/Hosted Customers/CompanyA”
Almost there…
Now, we need an Offline Address Book:
- New-OfflineAddressBook -Name “CompanyA” -AddressLists “Global Address List CompanyA”
- Global Address List CompanyA is the name of the GAL you assigned in the very first step
Finally, we create the Address Book Policy and assign all of the newly created Address Lists to it:
- New-AddressBookPolicy -Name “CompanyA Address Book Policy” -AddressLists “All Users CompanyA”,”All Distribution Lists CompanyA”,”All Contacts CompanyA” -RoomList “All Rooms CompanyA” -OfflineAddressBook “CompanyA” -GlobalAddressList “Global Address List CompanyA”
There you have it my loyal apprentice. Your Exchange Server 2016 deployment is now configured as a multi-tenant solution…for only one customer! Don’t forget to repeat the above for the other customers you bring on board, but with the required different values!
See, there’s a reason why the title of this blog is called The Beast That Is Multi-Tenancy!
Until next time, signing off!
Yours Truly,
Pure Awesomeness
“You want to be a writer, don’t know how or when? Find a quiet place, use a humble pen” – Paul Simon


