For email archive migrations one of the pre-requisites are accounts with the application impersonation role. Application Impersonation is a management role within Office365 (O365) enabling applications to impersonate users so actions can be performed on their behalf using EWS.
Within O365 there are two ways to set this up: via the O365 GUI or via PowerShell.
Migration account(s)
Create the migration account(s) via your normal process and set the password not to expire. Although this is not actually required to assign the role, setting the password to expire it will mean that once the account details are added into the migration tool you will not be needing to update them every 30,60,90 days depending on your policy. Having to update the credentials repeatedly could cause delays in the migration project.
Assigning role via the GUI
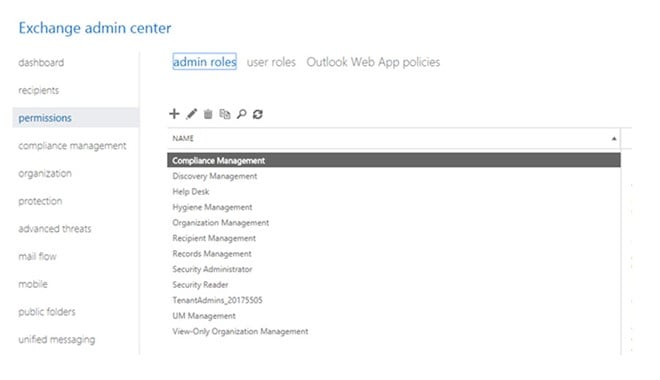
In the Exchange admin centre, under permissions, admin roles.

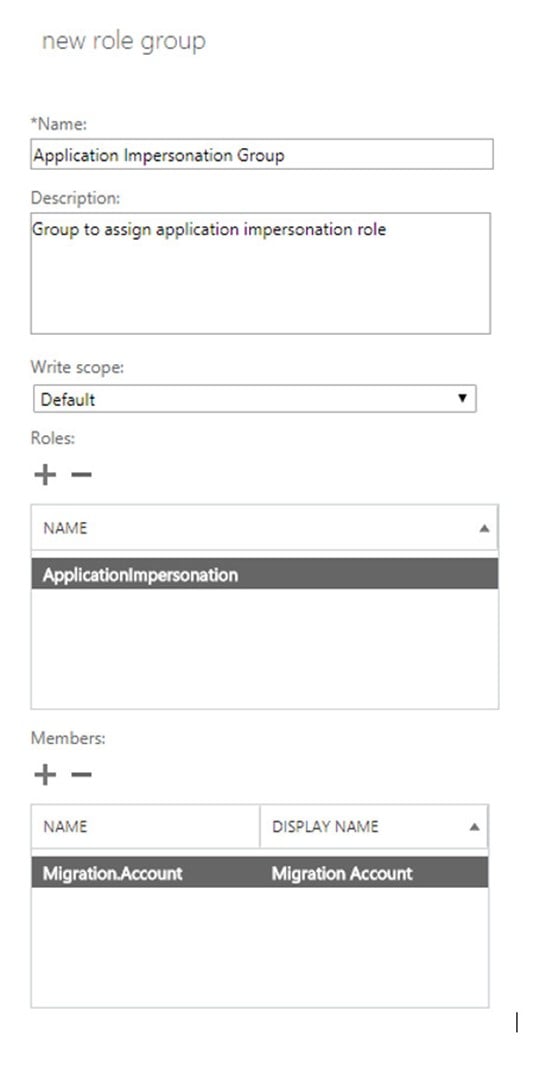
Click the + to add a new role group, give it a name and description then add the ApplicationImpersonation role to it. Finally add the members which will be the accounts (that you created earlier) you want to assign this role to and click save.

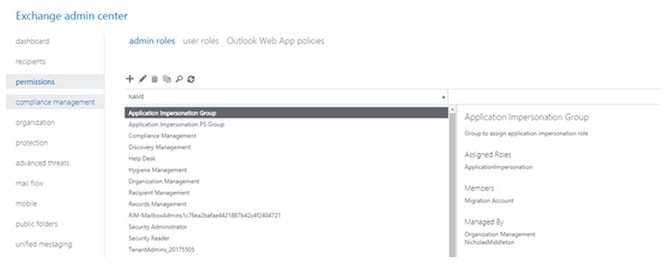
When you now look under the admin roles you will see the new admin role and on the right-hand side, you can see the role assigned.

Assigning role via PowerShell
Connect to your O365 PowerShell (https://docs.microsoft.com/en-us/powershell/exchange/exchange-online/connect-to-exchange-online-powershell/connect-to-exchange-online-powershell?view=exchange-ps#connect-to-exchange-online-powershell-1)
Creating the role group and assigning the role is done with a single script, replacing the <..> values as shown:
Syntax
New-RoleGroup -Name <admin role name> -Roles ApplicationImpersonation -Members <UPN for migration accounts>
Example
New-RoleGroup -Name “Application Impersonation PS Group” -Roles ApplicationImpersonation -Members Migration.Account.PS@nickslab.onmicrosoft.com
Output

You can check the Role Group with this script:
Syntax
Get-RoleGroup <Role group name>
Example
Get-RoleGroup “Application Impersonation PS Group”
Output
In the output, you can see the role assigned the members of the role group

Confirm that the application impersonation role is working
Browse to https://testconnectivity.microsoft.com/
- Click on the Office 365 tab.
- Select Service Account Access and click on Next
- Specify the target mailbox email address
- Specify the migration account user name
- Specify the migration account password
- Checkmark Specify Exchange Web Services URL and specify the URL https://outlook.office365.com/EWS/Exchange.asmx
- Check the box Use Exchange Impersonation.
- Check Ignore Trust for SSL.
- Click on Perform Test.
Once results are displayed, check the overall results; also click on Expand All.


