Have you ever wondered if you could create your own source repository instead of using the public source repositories? At the end of the day, if you submit your code to a cloud-based repository, who owns the code? Is it still you?
Personally, I like being in control of my intellectual property and to move the code whenever I want. Therefore, the reason I created this little guide to help you build your own local source repository.
Moreover, we are using Open Source GitLab code deployed on a Podman container (you can check out more on Pods in my blog article on Deploying Xwiki using Podman Pod). This implies you can use this as your testing base, but I suggest you learn how to use GitLab efficiently before you start using the public GitLab in anger- trust me!
Please note: The following has been deployed on Red Hat Enterprise Linux 9.0, but it will work on Rocky Linux or Fedora Server.
Requirements
- Build the RHEL 9.0 server with at least 4vCPUs and 8GB RAM.
- Ensure an additional 20-30GB of storage has been allocated to /var/lib/containers and the file system has been created on LVM volume.
- Ensure the host has a FQDN and both: A and PTR records have been registered in the DNS.
- Register the server using subscription manager (in case of Red Hat Enterprise Linux server):
# subscription-manager register- Update the server:
# dnf upgrade --refresh -y- Install podman packages:
# dnf install podman podman-remote podman-docker podman-plugins -y- We need to update the ssh service and enable the ssh service to run on port 2222/tcp (we will use 22/tcp for Gitlab).
- Edit /etc/ssh/sshd_config file and update the Port variable:
Port 2222- Update SELinux to allow ssh on 2222/tcp:
semanage port -a -t ssh_port_t -p tcp 2222 semanage port -l | grep ssh - Update ssh.xml firewalld service file:
cp /lib/firewalld/services/ssh.xml /etc/firewalld/services/- The following represents the ssh.xml file after changes:
<?xml version="1.0" encoding="utf-8"?> <service> <short>SSH</short> <description>Secure Shell (SSH) is a protocol for logging into and executing commands on remote machines. It provides secure encrypted communications. If you plan on accessing your machine remotely via SSH over a firewalled interface, enable this option. You need the openssh-server package installed for this option to be useful.</description> <port protocol="tcp" port="22"/> <port protocol="tcp" port="2222"/> </service> - Reload firewall rules:
firewall-cmd --reload- Restart ssh (remember ssh will be listening on port 2222/tcp):
systemctl restart sshd- Run the following command to start the GitLab container:
# podman run -dt -h $(hostname -f) \ -p 443:443 \ -p 80:80 \ -p 22:22 \ --name gitlab \ -v gitlab_config:/etc/gitlab:Z \ -v gitlab_logs:/var/log/gitlab:Z \ -v gitlab_home:/var/opt/gitlab \ --shm-size 256m \ gitlab/gitlab-ee:latest - It will take a while for GitLab to configure itself and start, you can observe the progress using the following command:
# podman logs -f gitlab- Open the firewall ports on the host:
firewall-cmd --add-service=https --add-service=http --permanent firewall-cmd --reload - Generate systemd unit file for GitLab container:
cd /etc/systemd/system/ podman generate systemd --new --files --name gitlab systemctl daemon-reload systemctl enable --now container-gitlab.service - Update GitLab configuration file.
- Edit the configuration file using the following command:
podman exec -it gitlab vi /etc/gitlab/gitlab.rb- Change the following line to the fqdn of the server (in the following example, the fqdn is rh9.example.net):
external_url 'https://rh9.example.net'- Enable self-signed certificate (Update the email. In the original you will have just empty brackets []. Enclose your email in quotations):
letsencrypt['enable'] = true letsencrypt['contact_emails'] = ['user@example.net'] - Restart the service to generate the certificate:
systemctl restart container-gitlab.service- Once the container starts, get the initial GitLab password:
podman exec -it gitlab grep 'Password:' /etc/gitlab/initial_root_password- Login to GitLab using the fqdn of the host where the GitLab container is running.
- Navigate to User settings and change the root password:
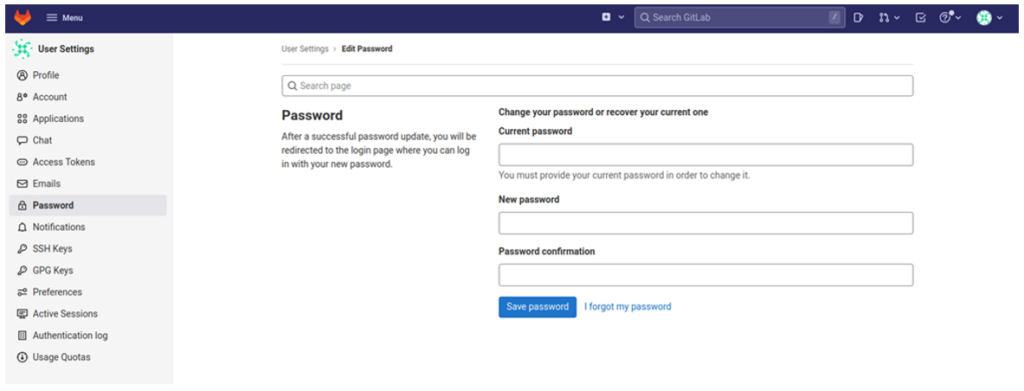
- Navigate to Menu → Admin Area → Settings → General and expand Sign-up restrictions. Disable Sign-up enabled and click Save Changes.
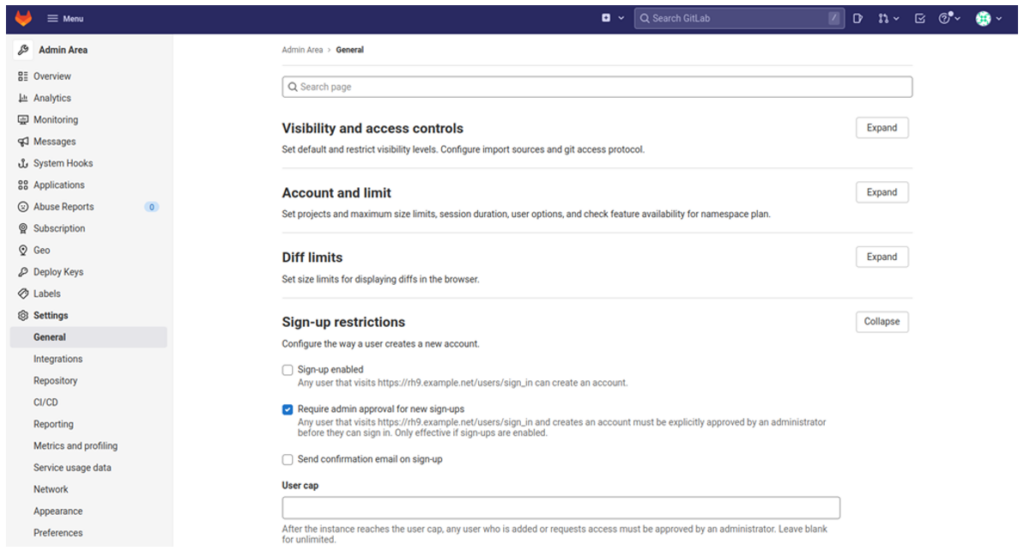
- There are plenty of additional settings, but you can investigate this for yourself. Do not be afraid to break the config. At the end of the day, it is enough to remove the volumes and start from scratch:
podman volumes list podman volume rm gitlab_config podman volume rm gitlab_home podman volume rm gitlab_logs Adding New Users
Let’s face it, we could run everything using the admin user, but it is not the right solution when you are sharing the space with many other people and you would like to ensure security.
- To add a new user, login to GitLab using the root user and navigate to Menu —> Admin Area —> Users and click New User.
- Fill out the form. The following screenshot is an example:
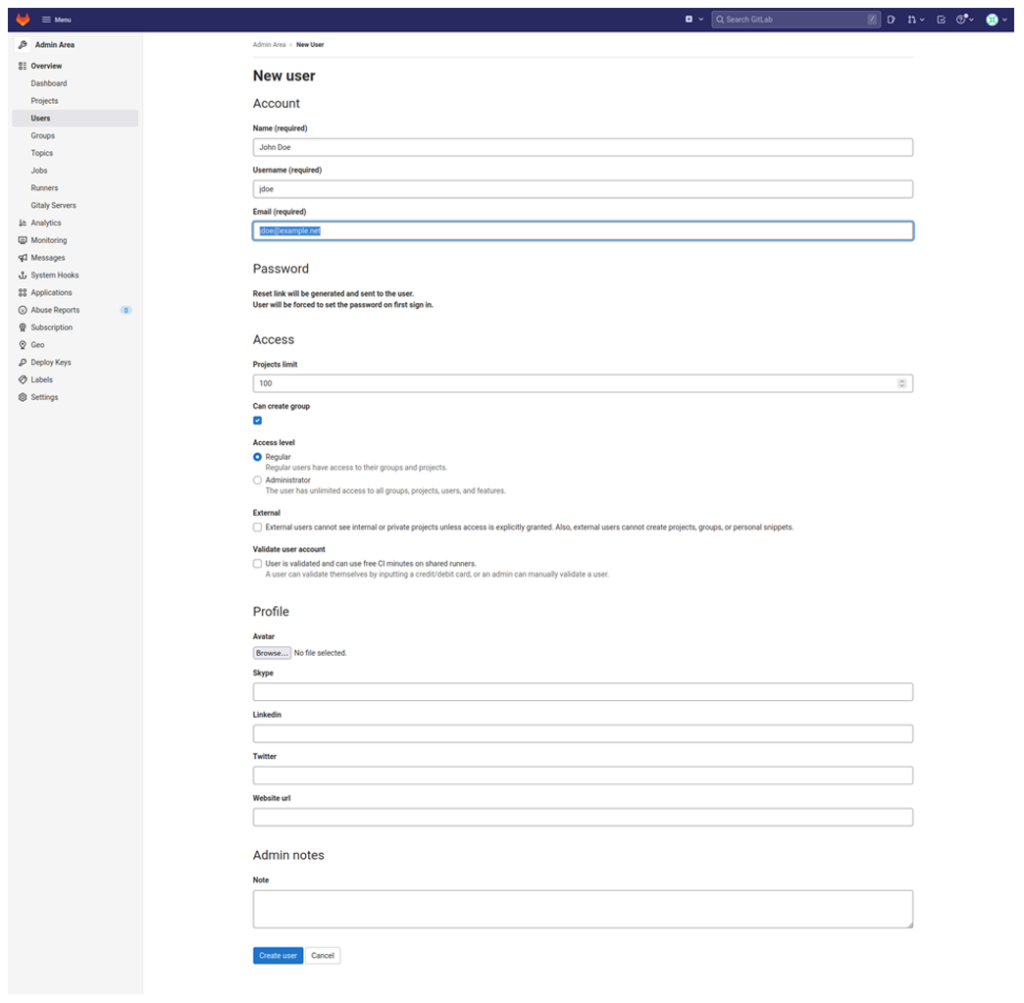
- The next time the user logs in, they will be asked to reset the password.
Adding SSH Keys for Authentication
- Log into GitLab using your standard user credentials (the user who is going to push the code to the repositories).
- In the top-right corner, click on the avatar and select preferences:

- Select SSH Keys
- Login to the host from which you are planning to push the code and execute the following command (if you work as a root):
[root@rhel8 ~]# cat ~/.ssh/id_rsa.pub ssh-rsa AAAAB3NzaC1yc2EAAAADAQABAAABAQDTHXwjoyJuVcvni1pv43hodioePD1zegJux5XJk0hY7MKTSjjFzlO3ZUrvhlzQnNgXG8hd9zs3ToVgs/nMIDbDJFb8bhb+ylHRjgkJ0JscndJEpfGDMdobmjYMTyYtcVpTsM3eLHJSPJwymA5C063rBB3bM3ArKD5YZwNcwmt+UsSKb4QwN1q4yDRK6lAheVp60636GVk6Zv1L5JLW1q0aNb4z6QYwVDIVIHA+HsBvL9w+bIaOeVuGfMwMoZTJ7NFVYlsqQ3K4OgbOL6oVLxyYDhOhgrC/9ospq2nOXya/aC2rrujEcRThNgI+BXNWEfQ5KWg2W2UGlvCUvCkJ98nT root@rhel8.example.net - In case you don’t have the key, run the following command:
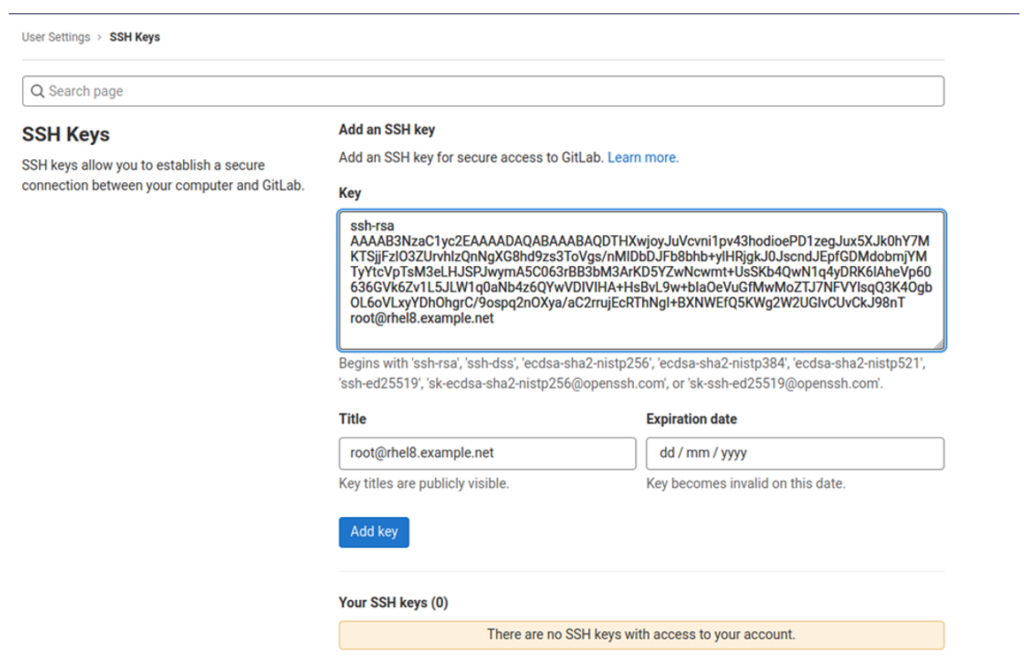
[root@rhel8 ~]# ssh-keyget -t rsa -b 2048 - Copy the id_rsa.pub key and paste in the Key field in GitLab Settings.
- Optionally – add the Expiration date and click Add key:
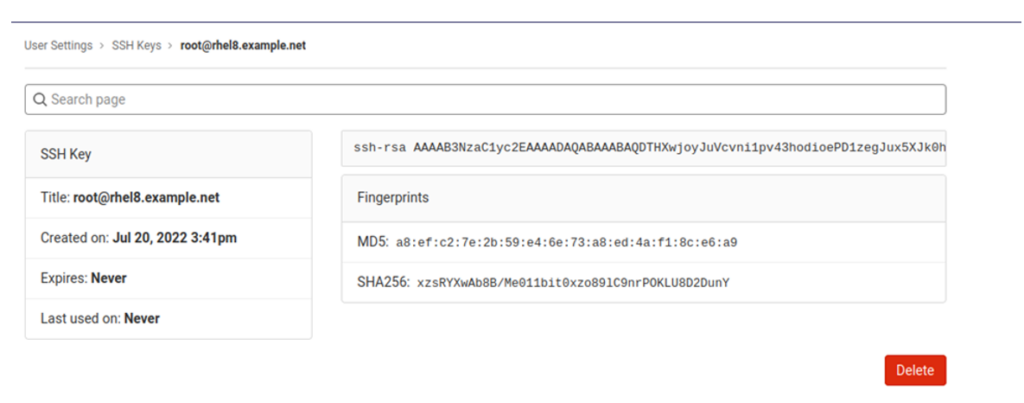
Adding a New Project
- Log into GitLab.
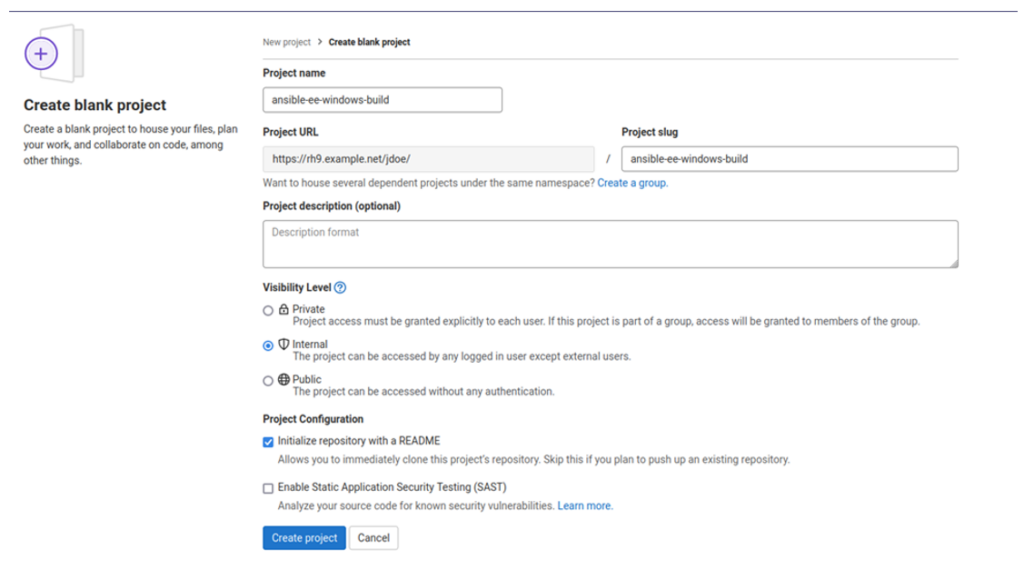
- Click on ‘New project’.
- Click on ‘Create blank project’.
- In the ‘Create blank project’ view, specify the Project name, select Visibility Level to ‘Internal’ and click ‘Create project’:
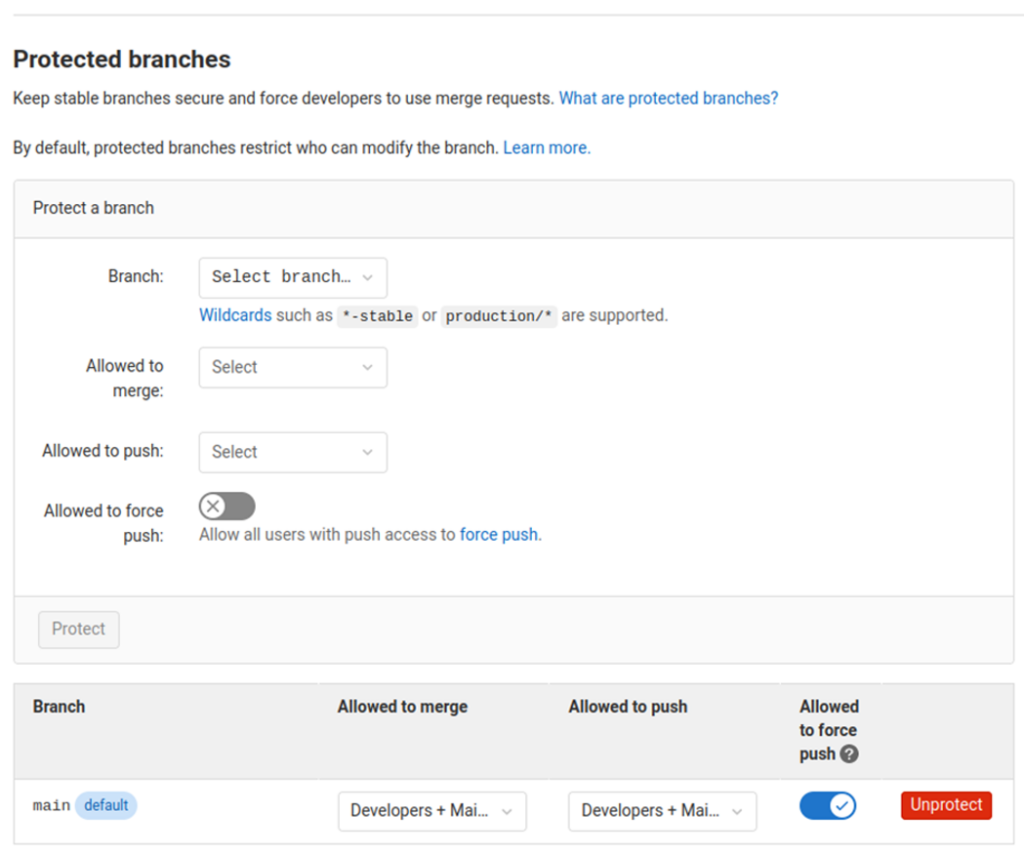
- Given you do not have the privileges required to push to the main branch, we need to change this setting. On the top of the page, there should be a ‘Settings’ button. Click it.
- In the left panel, under Settings click on ‘Repository’.
- In the Right panel, click on Expand in ‘Protected branches’.
- Enable ‘Allowed to push’ to ‘Developers + Maintainers’.
- Enable ‘Allowed to force push’:
- Navigate to the server where you developed the code. Make sure to use the user for which the ssh key has been installed in GitLab.
- Navigate to the directory where the code is stored. For example:
cd ansible-pack git init git add . git commit -m "Initial Commit" git remote add origin git@rh9.example.net:jdoe/ansible-host-provisioning.git git branch -M main git push -uf origin main Summary
GitLab is designed to make DevOps easier for developers and that extends to the creation of your own source repositories.
I hope you’ve found this post informative and easy to follow, but there’s a lot more to learn and I can’t wait to cover more on it (let us know if you have specific topics you’d like me to delve into).
To find out more about how Insentra can help your business navigate a changing technological landscape, please feel free to contact us today.


