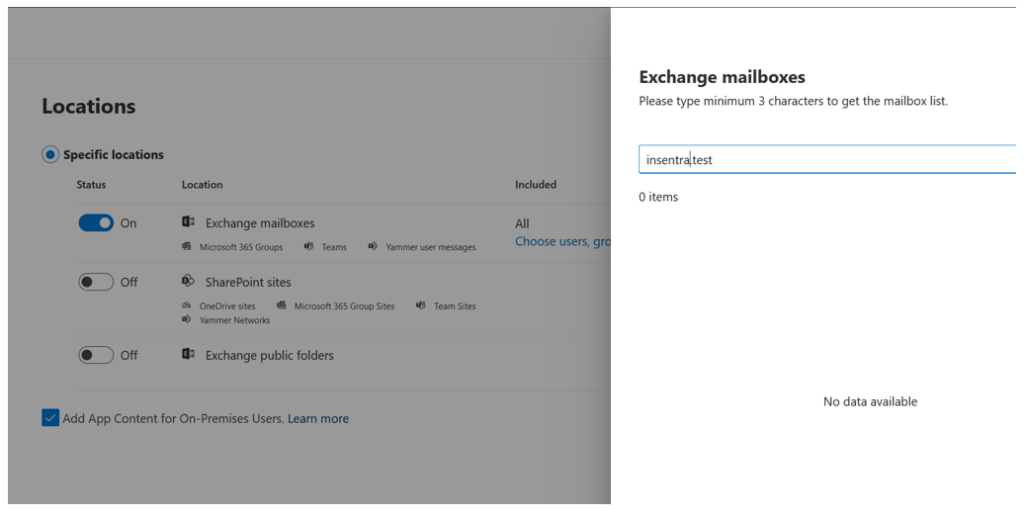
Working with a client recently an issue was noted when performing a content search within Microsoft’s Compliance Centre. Inactive mailboxes that were thought to be deleted from the environment were showing in the “Choose Users” filter in content search.
It is normal to see inactive accounts in the “Choose Users” filter of the content search, however in this situation the mailboxes did not have an Azure Active Directory (AAD) identity (account) and had been deleted before the retention policies being removed.
Using the Compliance Centre PowerShell to remove policies from the affected mailboxes was not possible as the AAD Identity no longer exists.
In this case where there is an inactive (or soft deleted) mailbox in Exchange Online, the retention is still in place and the user identity has been removed from Azure Active Directory (AAD), the following process can be used to retire the data.
Minimum Requirements:
- Exchange Online PowerShell (Reference step 1 below)
- Organisation Management permission
- Case Management (to test content search)
Step 1: Connecting to Exchange Online via PowerShell
Connection can be achieved by importing the Exchange Online PowerShell module and using the following syntax to connect.
Connect-ExchangeOnline -UserPrincipalName <UPN of an Exchange AdministatorStep 2: Identity Preparation
Note: If there is only one (1) inactive mailbox to process, take note of the Primary SMTP address and move on to step 3.
To generate a list of Inactive mailboxes run
Get-Mailbox -InactiveMailboxOnly | select PrimarySMTPAddress | export-csv c:\temp\InactiveUsers.csv This will output a list of inactive users to the Temp folder on the C drive (please note you need create a temp folder if one does not exist)
After the CSV export has been completed navigate to the file location and open the CSV. Remove any address that is not required and set the column header to PrimarySMTPAddress (case sensitive). Save and Close the CSV.
Step 3: Update Mailbox to remove all Retention Policies
To remove retention policies from a single user run:
Set-Mailbox < PrimarySMTPAddress of inactive mailbox> -ExcludeFromAllOrgHoldsTo remove retention policies for multiple users, copy and save this PowerShell script to import users from the CSV previously created.
- Open PowerShell ISE editor, copy and paste the below text
$inputfile	= "C:\temp\InactiveUsers.csv"

Import-Csv $inputfile | foreach {

  Write-Host "Removing Retention Holds: " -NoNewline; Write-Host $_.PrimarySMTPAddress -foregroundcolor $fc
  Set-Mailbox $_.PrimarySMTPAddress -ExcludeFromAllOrgHolds
  Write-Host "Completed: " -NoNewline; Write-Host $_.PrimarySMTPAddress -foregroundcolor $fc
}
- Save the file to the c:\temp folder naming it UpdateRetentionHolds.ps1
- In the PowerShell prompt navigate to the file in the temp folder
- type .\UpdateRetentionHolds.ps1 and press Enter
This will import the csv and remove any retention holds for the Primary SMTP Addresses listed in the CSV. The script above confirms when the actions have completed successfully.
Step 4: Check and Remove delay holds on a Mailbox
The DelayHold and DelayReleaseHold flags on the mailbox may still be set to true. Which effectively means data within the mailbox can be retained for 30 days until an automated process is run to set the flags to false. By setting the flags to false the mailbox and data can be permanently deleted without waiting.
To check if the DelayHold and DelayReleaseHold flags are set to false this command can be run.
Get-Mailbox <PrimarySMTPAddress> -InactiveMailboxOnly | FL *HoldApplied* The <PrimarySMTPAddress> can be left out in the above command which will display all Inactive mailboxes and the hold statuses.
To set the DelayHold and DelayReleaseHold flags to false these commands can be run for a single user:
Set-Mailbox <PrimarySMTPAddress> -InactiveMailboxOnly  -RemoveDelayHoldApplied
Set-Mailbox <PrimarySMTPAddress> -InactiveMailboxOnly -RemoveDelayReleaseHoldApplied
Alternatively the same CSV process in step 3 can be deployed to process multiple Inactive mailboxes
- Open PowerShell ISE editor, copy and paste the below text
$inputfile	= "C:\temp\InactiveUsers.csv"

Import-Csv $inputfile | foreach {

  Write-Host "Removing Delay Holds: " -NoNewline; Write-Host $_.PrimarySMTPAddress -foregroundcolor $fc
  Set-Mailbox $_.PrimarySMTPAddress -InactiveMailboxOnly  -RemoveDelayHoldApplied
  Set-Mailbox $_.PrimarySMTPAddress -InactiveMailboxOnly -RemoveDelayReleaseHoldApplied
  Write-Host "Delay holds removed for: " -NoNewline; Write-Host $_.PrimarySMTPAddress -foregroundcolor $fc
}
- Save the file to the c:\temp folder naming it RemoveDelayHolds.ps1
- In the PowerShell prompt navigate to the file in the temp folder
- type .\RemoveDelayHolds.ps1 and press Enter
This will import the csv and set DelayHold and DelayReleaseHold flags to false for the Primary SMTP Addresses listed in the CSV. The script above confirms when the actions has completed successfully.
Step 5: Permanently Remove the mailbox from the Environment
Once the inactive mailbox has had the retention policies and delay holds removed it is ready for permanent deletion.
As with the previous step this can be achieved singularly.
Remove-Mailbox -Identity <PrimarySMTPAddress> -PermanentlyDelete or with the CSV import process
- Open PowerShell ISE editor, copy and paste the below text
$inputfile	= "C:\temp\InactiveUsers.csv"

Import-Csv $inputfile | foreach {

  Remove-Mailbox -Identity $_.PrimarySMTPAddress -PermanentlyDelete
  Write-Host "Mailbox permanently Deleted: " -NoNewline; Write-Host $_.PrimarySMTPAddress -foregroundcolor $fc
}
- Save the file to the c:\temp folder naming it RemoveMailbox.ps1
- In the PowerShell prompt navigate to the file in the temp folder
- type .\RemoveMailbox.ps1 and press Enter
Step 6: Confirm Inactive mailbox is not searchable
Now that the inactive mailbox has been removed, the Compliance Centre content search will not show the inactive mailbox in the filter criteria. This can be tested by logging into the Compliance Centre and setting up a content search.

When setting up the content search toggle on Exchange Mailboxes Location and select “Choose Users”. This will open a pane in the right side of the web browser where you can enter the primary smtp address of the removed accounts, the results of the filter will be blank.
Knowing what data the business has and where it is stored is crucial as data that is no longer legitimately required can impact businesses. Fundamentally, processes need to be refined and updated as new technology is adopted, Insentra can help businesses with advisory services which analyse, report and advise on planning.


