If you’re in IT, you’ll notice you’ve been hearing about Ansible more and more lately. CIO has said “Ansible has come from nowhere to be the number one choice for software automation in many organisations.”
The controller in Ansible Automation Platform allows for jobs to be executed via the Ansible playbook, either directly on a member of the cluster or in a namespace of an OpenShift cluster with the required service account provisioned (called a Container Group).
Jobs are executed on the controller, which are authorised by Container Groups, regardless of whether the controller is installed as a standalone, in a virtual environment or in a container. Container Groups operate as a group of resources within a virtual environment. It’s possible to create Instance Groups which point to an OpenShift Container, which are job environments provisioned on-demand as a Pod and exists only for the duration of the playbook run. This mode of execution is known as the ephemeral execution model and ensures a clean environment for every job run.
Create a Container Group
A ContainerGroup is a type of InstanceGroup which has an associated Credential and allows for connecting to an OpenShift cluster. To set up a container group, it is necessary to have the following:
- An OpenShift namespace the pod can be launched into (every cluster has a “default” namespace, but this namespace should not be used for the purpose of the container group).
- An OpenShift service account with the role granting permissions to launch and manage Pods and secrets in this namespace.
- If you will be using execution environments in a private registry and have a Container Registry credential associated to them in the automation controller, the service account also needs the roles to get, create, and delete secrets in the namespace. If you do not want to give these roles to the service account, you can pre-create the ImagePullSecrets and specify them on the pod spec for the ContainerGroup. In this case, the execution environment should NOT have a Container Registry credential associated, or the controller will attempt to create the secret for you in the namespace.
- A token associated with the service account (OpenShift or Kubernetes Bearer Token).
- A CA certificate associated with the cluster.
The following section describes creating a Service Account in an OpenShift cluster (or K8s) in order to be used to run jobs in a container group via an automation controller. After the Service Account is created, its credentials are provided to the controller in the form of an OpenShift or Kubernetes API bearer token credential. Below describes how to create a Service Account and collect the required information for configuring the automation controller.
The Process
- Log into the OCP as kubeadmin or the user with admin privileges.
- Create a new namespace:
$ oc new-project aap-containergroup-cus- Update the following file as required. It is important to update the namespace to match the project name. Once all updates are done. Save the file as containergroup-sa.yml.
apiVersion: v1
kind: ServiceAccount
metadata:
  name: containergroup-service-account
  namespace: aap-containergroup-cus
---
kind: Role
apiVersion: rbac.authorization.k8s.io/v1
metadata:
  name: role-containergroup-service-account
  namespace: aap-containergroup-cus
rules:
- apiGroups: [""]
  resources: ["pods"]
  verbs: ["get", "list", "watch", "create", "update", "patch", "delete"]
- apiGroups: [""]
  resources: ["pods/log"]
  verbs: ["get", "list", "watch", "create", "update", "patch", "delete"]
- apiGroups: [""]
  resources: ["pods/attach"]
  verbs: ["get", "list", "watch", "create", "update", "patch", "delete"]
- apiGroups: [""]
  resources: ["secrets"]
  verbs: ["get", "list", "watch", "create", "update", "patch", "delete"]
---
kind: RoleBinding
apiVersion: rbac.authorization.k8s.io/v1
metadata:
  name: role-containergroup-service-account-binding
  namespace: aap-containergroup-cus
subjects:
- kind: ServiceAccount
  name: containergroup-service-account
  namespace: aap-containergroup-cus
roleRef:
  kind: Role
  name: role-containergroup-service-account
  apiGroup: rbac.authorization.k8s.io
- Create the service account and the role:
oc apply -f containergroup-sa.yml- Get the secret name associated with the service account:
export SA_SECRET=$(oc get sa containergroup-service-account -o json | jq '.secrets[0].name' | tr -d '"')- Get the token from the secret:
oc get secret $(echo ${SA_SECRET}) -o json | jq '.data.token' | xargs | base64 --decode > containergroup-sa.token- Get the CA cert:
oc get secret $SA_SECRET -o json | jq '.data["ca.crt"]' | xargs | base64 --decode > containergroup-ca.crt- Create a new OpenShift secret which will be used to pull the image from the Private Hub. Ensure the ‘–docker-server’ is set to a correct Private Hub:
oc create secret docker-registry pah-secret \
    --docker-server=ansible-npd-automationhub.ocp.example.com \
    --docker-username=admin \
    --docker-password=your_password
- Link the secret to the service account:
oc secrets link containergroup-service-account pah-secret --for=pull- Ensure the ‘Image Pull Secret’ is associated with the service account:
# oc describe sa/containergroup-service-account

Name:                containergroup-service-account
Namespace:           aap-containergroup-01
Labels:              <none>
Annotations:         <none>
Image pull secrets:  containergroup-service-account-dockercfg-dld9s
                     pah-secret
Mountable secrets:   containergroup-service-account-dockercfg-dld9s
                     containergroup-service-account-token-shkbp
Tokens:              containergroup-service-account-token-j2mkg
                     containergroup-service-account-token-shkbp
Events:              <none>
- Navigate to ‘AAP UI’ and log in with administrative privileges.
- Navigate to ‘credentials’ and create a new credential OpenShift or Kubernetes API Bearer Token. Use the Openshift API Endpoint as indicated below. Use the bearer token from the ‘containergroup-sa.token’ file created in the previous step and Certificate Authority data from the ‘containergroup-sa.crt’ file.

- Navigate to ‘Instance Groups’ and click ‘add’. Specify the name and the credential created in a previous step. Select ‘Customise pod specification’. Ensure to update the namespace and the Private Hub/image (if required). Specify the ‘imagePullSecret (pah-secret)’:
apiVersion: v1
kind: Pod
metadata:
  namespace: aap-containergroup-cus
spec:
  serviceAccountName: containergroup-service-account
  automountServiceAccountToken: false
  containers:
    - image: >-
        ansible-npd-automationhub.ocp.example.com/aap_ee_image
      name: worker
      imagePullSecrets:
      - name: pah-secret
      imagePullPolicy: Always
      args:
        - ansible-runner
        - worker
        - '--private-data-dir=/runner'
      resources:
        requests:
          cpu: 250m
          memory: 100Mi
- Click ‘save’.
Testing
- Navigate to the ‘Inventories’ section of AAP.
- Create a new inventory. For example: INV-CG-TEST.
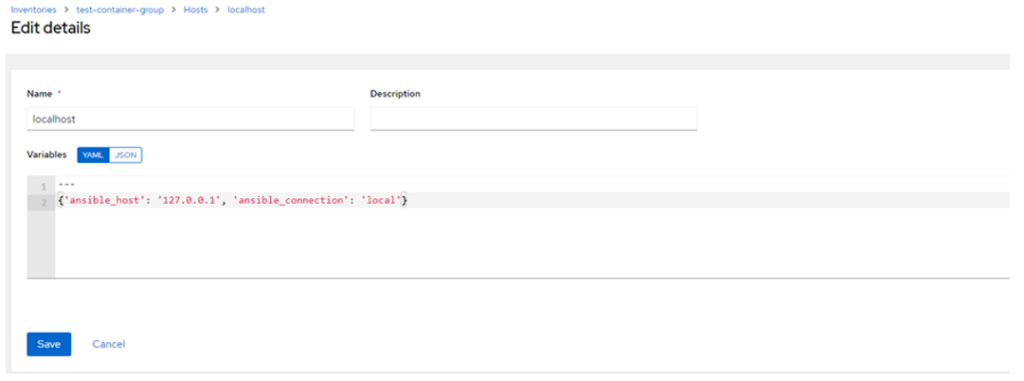
- Click on ‘Hosts’ and add a localhost:

- Specify the variables as noted above:
{'ansible_host': '127.0.0.1', 'ansible_connection': 'local'}- Save.
- Select the ‘localhost’ and click ‘Run Command’:

- Choose the module ‘setup’ and click ‘Next’:

- In the initial run, do not select any Execution Environments and click ‘Next’:

- Select ‘Demo Credentials’ (or any other) and click ‘Next’:

- Before clicking ‘Launch’, open the session to the server where you can execute ‘oc’ commands. Ensure you are in the context of the project/namespace used for the container group and run. This will allow you to monitor the pods created for the execution:
oc get pods -o wide -w- Click ‘Launch’:

- If the AAP controller can communicate with the OCP cluster and the configuration is correct, you should expect the following results:

and from oc get pods command:
$ oc get pods -o wide -w
NAME                       READY   STATUS    RESTARTS   AGE   IP       NODE     NOMINATED NODE   READINESS GATES
automation-job-108-hvbsv   0/1     Pending   0          0s    <none>   <none>   <none>           <none>
automation-job-108-hvbsv   0/1     Pending   0          0s    <none>   aro-cus-npd-clu01-pn279-d8s-worker-centralus2-xsf6p   <none>           <none>
automation-job-108-hvbsv   0/1     ContainerCreating   0          0s    <none>   aro-cus-npd-clu01-pn279-d8s-worker-centralus2-xsf6p   <none>           <none>
automation-job-108-hvbsv   0/1     ContainerCreating   0          2s    <none>   aro-cus-npd-clu01-pn279-d8s-worker-centralus2-xsf6p   <none>           <none>
automation-job-108-hvbsv   1/1     Running             0          4s    10.207.14.245   aro-cus-npd-clu01-pn279-d8s-worker-centralus2-xsf6p   <none>           <none>
automation-job-108-hvbsv   0/1     Completed           0          7s    10.207.14.245   aro-cus-npd-clu01-pn279-d8s-worker-centralus2-xsf6p   <none>           <none>
automation-job-108-hvbsv   0/1     Terminating         0          7s    10.207.14.245   aro-cus-npd-clu01-pn279-d8s-worker-centralus2-xsf6p   <none>           <none>
- Check the events:
$ oc get events
LAST SEEN   TYPE     REASON           OBJECT                         MESSAGE
2m24s       Normal   Scheduled        pod/automation-job-108-hvbsv   Successfully assigned aap-containergroup-01/automation-job-108-hvbsv to aro-cus-npd-clu01-pn279-d8s-worker-centralus2-xsf6p
2m22s       Normal   AddedInterface   pod/automation-job-108-hvbsv   Add eth0 [10.207.14.245/23] from openshift-sdn
2m22s       Normal   Pulling          pod/automation-job-108-hvbsv   Pulling image "registry.redhat.io/ansible-automation-platform-22/ee-supported-rhel8@sha256:8b8cdac85133daaa051d2d4d42cebb15ed41c01caf7dc75e5eeb8a895a0045b5"
2m21s       Normal   Pulled           pod/automation-job-108-hvbsv   Successfully pulled image "registry.redhat.io/ansible-automation-platform-22/ee-supported-rhel8@sha256:8b8cdac85133daaa051d2d4d42cebb15ed41c01caf7dc75e5eeb8a895a0045b5" in 1.317926879s
2m21s       Normal   Created          pod/automation-job-108-hvbsv   Created container worker
2m21s       Normal   Started          pod/automation-job-108-hvbsv   Started container worker
- Perform the test using the Execution Environment stored on the Private Hub. Ensure you are using the Template which has been already tested with this Execution Environment and the result was successful. Note the Instance Group selection (container group) and the Execution Environment. You should see in OCP events image pull from the PAH:


$ oc get pods -o wide -w
NAME                       READY   STATUS    RESTARTS   AGE   IP              NODE                                                  NOMINATED NODE   READINESS GATES
automation-job-109-gzggz   1/1     Running   0          19s   10.207.17.180   aro-cus-npd-clu01-pn279-d8s-worker-centralus3-g4r4q   <none>           <none>
automation-job-109-gzggz   0/1     Completed   0          75s   10.207.17.180   aro-cus-npd-clu01-pn279-d8s-worker-centralus3-g4r4q   <none>           <none>
automation-job-109-gzggz   0/1     Terminating   0          75s   10.207.17.180   aro-cus-npd-clu01-pn279-d8s-worker-centralus3-g4r4q   <none>           <none>
$ oc get events
LAST SEEN   TYPE     REASON           OBJECT                         MESSAGE
2m50s       Normal   Scheduled        pod/automation-job-109-gzggz   Successfully assigned aap-containergroup-01/automation-job-109-gzggz to aro-cus-npd-clu01-pn279-d8s-worker-centralus3-g4r4q
2m49s       Normal   AddedInterface   pod/automation-job-109-gzggz   Add eth0 [10.207.17.180/23] from openshift-sdn
2m49s       Normal   Pulling          pod/automation-job-109-gzggz   Pulling image "ansible-npd-automationhub.ocp.example.com/satellite_ee_image:latest"
2m48s       Normal   Pulled           pod/automation-job-109-gzggz   Successfully pulled image "ansible-npd-automationhub.ocp.example.com/satellite_ee_image:latest" in 1.055586975s
2m47s       Normal   Created          pod/automation-job-109-gzggz   Created container worker
2m47s       Normal   Started          pod/automation-job-109-gzggz   Started container worker
Conclusion
To sum up our step-by-step guide, using Ansible Automation Container Groups can significantly simplify your processes!
In this article, we hope to have given you some in-depth knowledge of how to create an Ansible Automation Container Group.
To find out more about how you can be more valuable to your organisation, learn about Insentra’s Professional Services experts.
As always, please contact us if you need any assistance with your IT requirements to see how we can help.


